
New 3D Printer (SLA-Like)
On a whim, I decided to try something different. I ordered an LCD resin printer. A lot of people call them “SLA”, although SLA is a completely different technology, but they are both resin printers. These printers use a UV activated plastic resin and some form of UV light manipulation to harden the resin into a 3D print/part.
I ordered one from AnyCubic over a month ago. They charged my card, but have not shipped it yet, and even if/when they do- it will be slow boat from China, so it likely won’t get here until a month later. I emailed them several times inquiring about my order status, and never heard back from them. I have since emailed them to cancel the order and refund my money. Still nothing. I suspect I will get stuck with their printer if it every arrives. In other words- I don’t recommend buying from AnyCubic, at all!
Update: I got stuck with the Anycubic printer a few weeks later. And… it’s got a lot going for it. Read more here: Another 3D Printer…
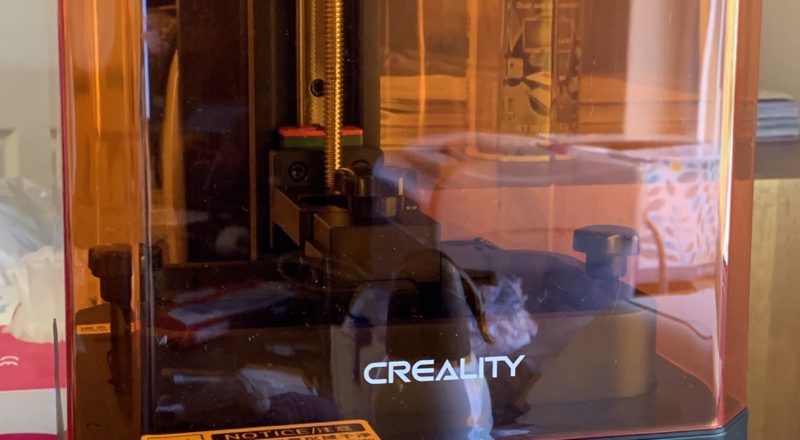
I’m sure AnyCubic makes good printers, but based on their terrible sales customer service- I’m not interested in them anymore. I ordered a Creality LD-002R from Amazon instead. It’s a very popular entry-level resin printer, and was delivered overnight. Here is a link:
If you are considering getting any resin printer like this, there are a number of things you need to be aware of first. I knew about most of these going in, but others are from my limited one week of experience and a lot of YouTube videos…
The biggest thing to be aware of is unlike the relative safety of FDM filament…
3D printing resin is a dangerous toxic goo.
It smells pretty bad, and you can’t get it on your skin or spend too much time directly exposed to it. Don’t take this lightly. At the very least- you need to wear gloves, and should wear eye protection and a mask while working with it.
The printer works by exposing the resin to UV light through an LCD filter, which on printers like this is usually a 5-6″ diagonal 4K screen. Some printers (like the Creality) use multiple UV light sources and properties of the LCD to provide anti-aliasing (smoothing) of the print.
The resin sits in a vat with a clear bottom made of a special plastic called FEP. This is like a drum head, and each layer of freshly-printed (hardened) resin just peals off of it. A platform moves up and down, collecting the printed resin layer-by-layer. It’s a slow process, but yields pretty incredible results down to .01mm/layer. That’s 200x smaller layers than most FDM printers. Most people actually print at .05mm as it is a lot faster and less prone to issues.
So, your print actually “prints” upside down. Also, there is no “bridging” in this kind of printing- so you WILL need supports, and you will need a lot of them. Fortunately the software does a pretty good job of generating them, and it is easy to add/remove them yourself. There are a lot of tutorials online as-well. They are also reasonably easy to remove, especially if you do it before curing.
The prints themselves require cleaning, processing, and curing afterwards. You can’t just pull them off the printer and use them like most FDM prints. Just removing them from the plate is a lot more of a challenge- it takes a lot of finesse with a sharp metal scraper as they will be quite-firmly adhered to the aluminum plate. I’ve been lucky so far and haven’t destroyed any of mine, but I’ve seen examples in YouTube videos of them being ruined by a scraper slip. I’ve found sometimes it is easier to cut the supports so you can get the print off and start processing it, and then scrape the supports off. Also- a thicker “skate” support is a lot easier to work with. It has beveled edges.
Once you get the print off the plate, the excess resin needs to be cleaned off of it. Again- remember- this is toxic goo! In the past- the parts needed to be thoroughly cleaned with Isopropyl alcohol, which is in very short supply and can be ridiculously expensive. There are alternative cleaning methods now, and some manufacturers have produced “water washable” resins. I’ll post more on this later.
After cleaning and removing the supports (and there are LOTS of supports), the print needs to be further cured in UV light. Some people buy expensive UV curing cabinets/machines, some just leave it out in the sun for a while. Either way- you also have to find a balance- too much curing leads to faded, rough, and brittle prints, too little also leaves the print very fragile.
Afterwards- you have to face cleaning the machine. The leftover resin in the vat needs to be filtered and either returned to its original bottle, or into a similar UV-blocking clean bottle. The vat and plate need to be very thoroughly cleaned, again- using Isopropyl alcohol is recommended, regardless of the type of resin used (like water-washable).
So- there is a lot of preparation and cleaning involved in this kind of printing. The benefits are some amazingly detailed prints, unlike anything you can get from other 3D printer technology. It’s just important to know what is involved, as the ads you will see for these printers just talk about the detail and technology, and not about the mess you have to deal with.
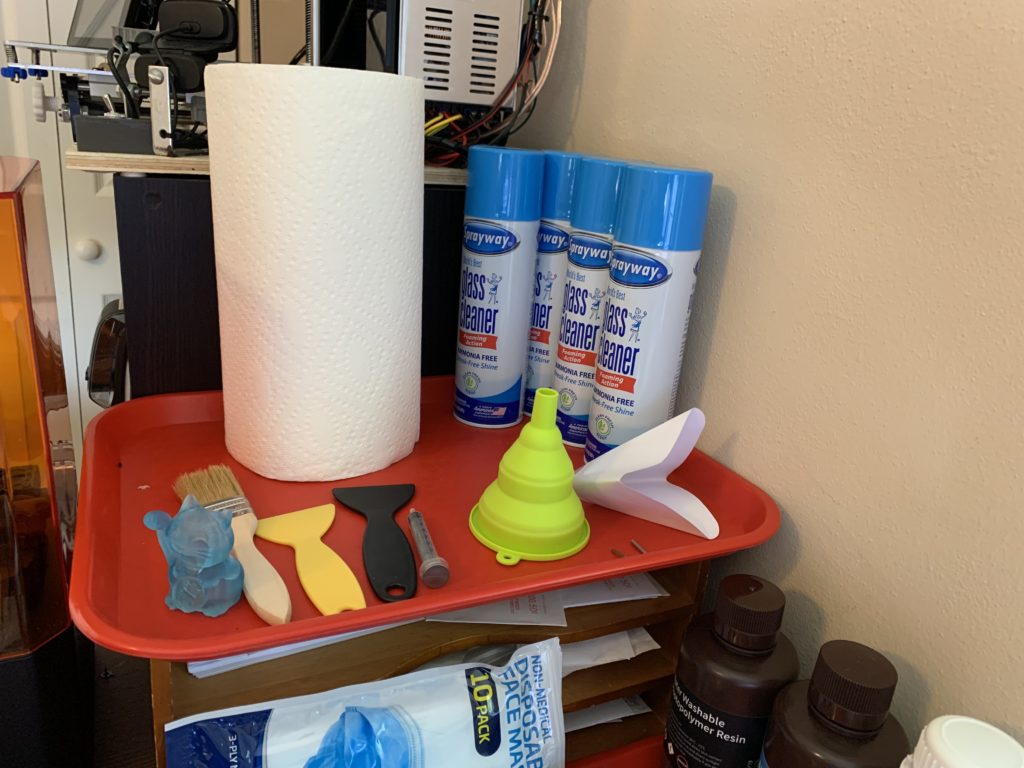
So, here is my setup:
Ideally- order all of this stuff at the same time, or before, you order your printer. You will want to have everything in-place when your printer arrives. They generally come almost-fully-assembled, and can be ready to “print” in just a few minutes.
Misc:
First, you want either a desk/counter that is liquid-safe, actually toxic and potentially caustic liquid-safe. Since most of us don’t have lab-grade counters to work on, these make everything so much easier:
https://www.amazon.com/dp/B00FRIASHU
You can buy these for a few $ each in a variety of sizes, shapes, and colors on Amazon. They are fantastic for this hobby, and actually for many others. I’m using them for electronics repairs and assembly too, as they keep all the parts contained. Spills are contained, and they are easy to clean by just wiping out with a paper towel.
You also want something to clean and rinse your parts in. I found these recommended online, and have to say they are probably the best thing you can buy for this…
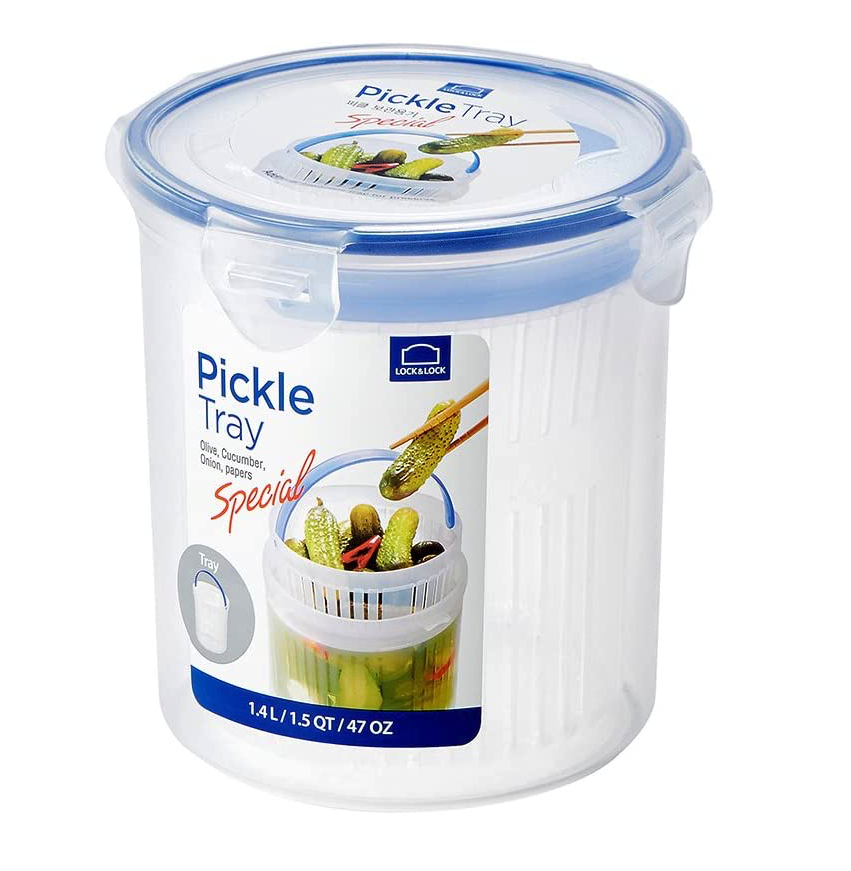
https://www.amazon.com/dp/B06WD1F7HD
These have an air-tight seal and have a basket inside that can be used to agitate your parts, and to easily remove them. The 1.5qt. size is about perfect for the prints you can make in this printer. You can just keep alcohol or other solvents in them so they are always ready to use.
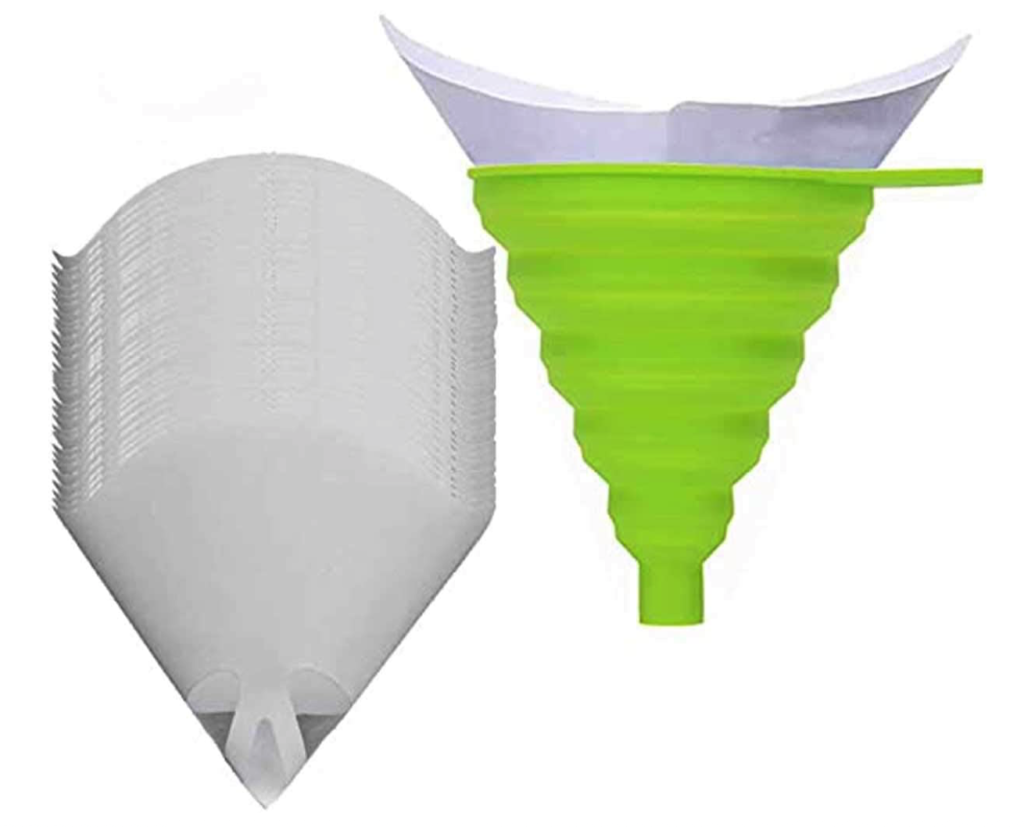
You will also need to be able to filter and recycle your resin. The printer will come with a few paper filter funnels for this, but you will need a lot more. You also want to either buy or 3D-print a hard funnel to hold them, as the paper filters can easily fall out of the resin bottles if used by themselves. The filters themselves are also usually larger than the resin bottle opening, so you can make a very big mess very fast if you just use the paper funnel.
I got these, which I felt were a pretty good deal:
You also, of course, want resin! Unless you buy some kind of a bundle, chances are pretty good your printer won’t come with it. It comes in 500ml and 1000ml (liter) bottles in a variety of colors, in transparent/translucent and opaque forms. I recommend for fun that you get something transparent, since that’s something you can’t really do well on FDM 3D printers.
For cleaning your prints with IPA (Isopropyl Alcohol) you don’t really need more than the pickle container or another container large enough to contain your part and allow you to agitate it. For alternative cleaning methods, and even just to REALLY clean your parts good, you may also want an ultrasonic cleaner. I have one of these:
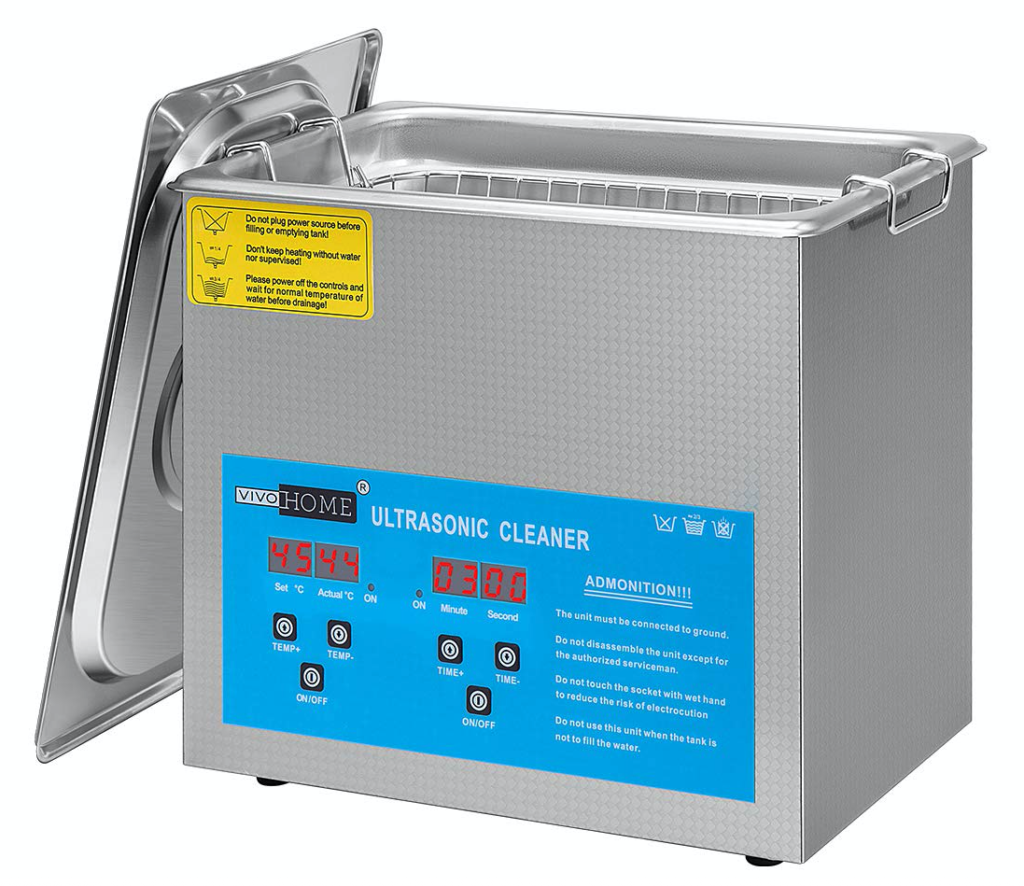
I got one used though, for 1/3 the price of the new one, so shop around.
You also might want some cheap “chip” paint brushes. These help clean the prints.
Another thing I’ve found to be very helpful- if you have an FDM 3D printer- print yourself one of these:
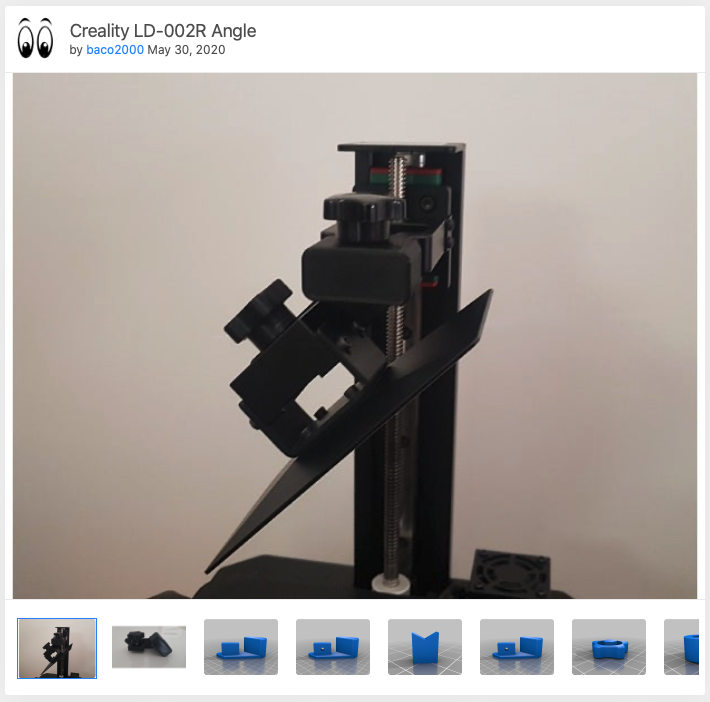
It is an adapter that lets you temporarily mount the build plate at an angle over the vat. This helps all of the resin that has accumulated on the plate drip into the vat so it can be reused instead of wasted. In most cases you can leave your print on the plate and this will help it drain off excess resin as-well.
Finally- you need to decide how you are going to cure your prints. Some people do this for free by just putting them out in the sunlight. Generally 15-30 minutes in bright sunlight is enough. You do want to rotate the print to make sure all sides of it get exposed. Some get little solar turntables to do this. Of course- on cloudy days or in the middle of Winter, this might not be a very good option.
There are relatively expensive curing cabinets, and “wash and cure” machines for this as-well. At least for the time-being, I don’t feel these are necessary. They are just something else to clean and maintain.
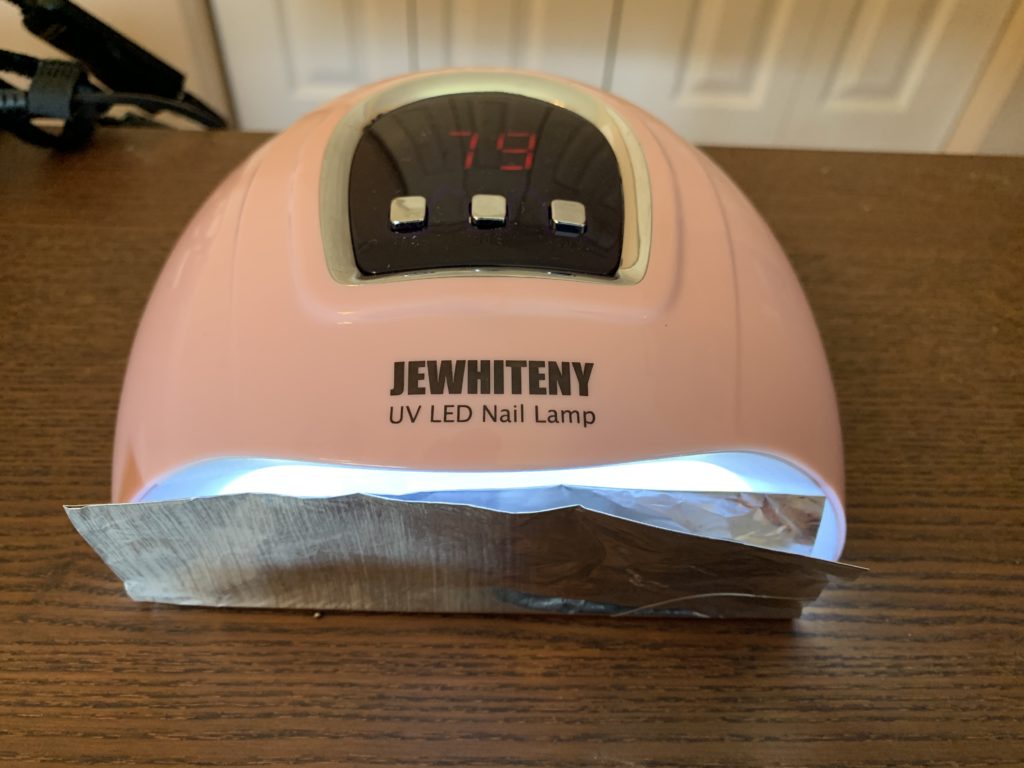
I actually just use a cheap gel nail polish lamp, which has the same UV LEDs as the curing cabinets/machines. I found one at a discount store for under $10, and you can find them on Amazon for around $15-$20.

My prints are small enough that they just fit underneath it. I set them on a sheet of foil, folded up in the front to block the UV light, and set this on top of it. I just use the 90 second timer, and rotate the piece a few times. For larger prints- I could just use this on top of a new paint can (reflective interior) with a little solar turntable. I haven’t done that yet.
P.P.E.
This is in its own section, because it is very-very important!
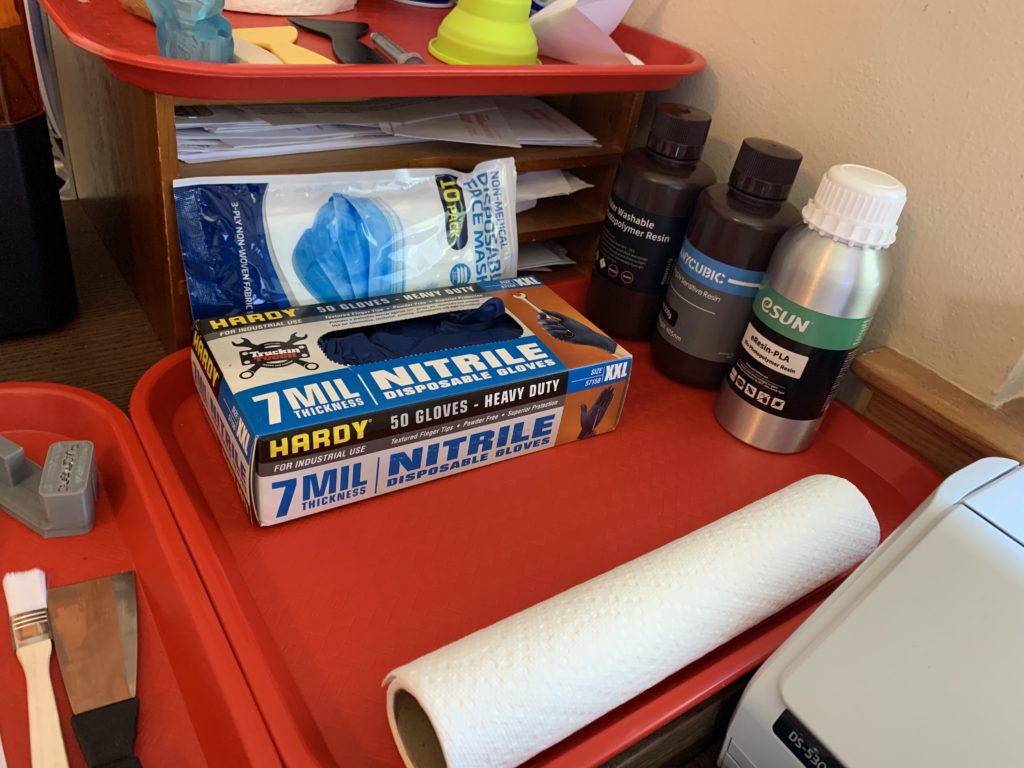
You will NEED disposable gloves. Any kind will work, but Nitrile are the most durable. I buy boxes of them at Harbor Freight for this, as well as other hobbies and cleaning tasks. They seem to be the cheapest without ordering from China.

I like the 7MIL ones for this. They make thinner ones too, but too thin is more prone to tearing. Side-note- the 9MIL ones are great if you do your own work on you car, lawnmowers, etc. and are also great for refinishing and painting. Like everything else “protective” right now- they cost twice as much as they did a year ago, but you don’t want to fudge this. The resin can cause contact dermatitis and burning, and you can quickly develop a very serious allergic reaction to it. It’s dangerous!
You SHOULD also use a face covering/mask, like a disposable medical/surgery mask. Again, I love Harbor Freight for these as their prices seem lower than anyone else’s, and their quality on these is very good.
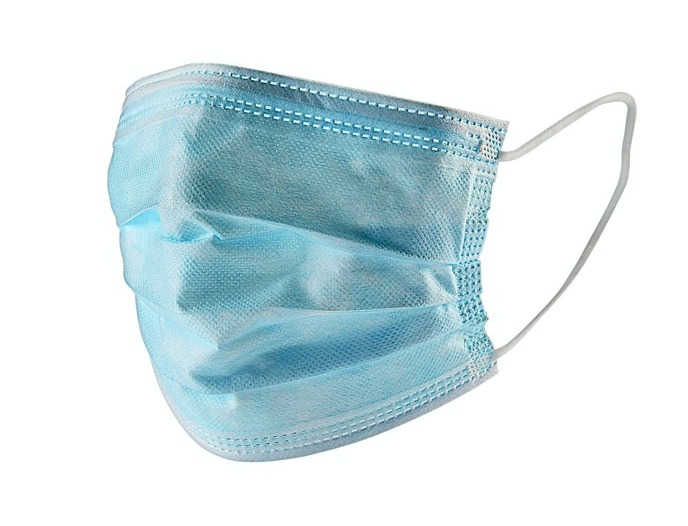
Similar to the gloves- these cost at least twice as much as they did a year ago, but unfortunately that’s just the way things are now.
A lot of people do fudge on this one. The resin can cause respiratory issues with prolonged exposure, and if you have issues anyway- you want to be careful. It goes without saying that you should also be doing this stuff in a well-ventilated area. I open the windows in my office where the printer is. Not sure what I will do in the winter yet. I might do some kind of a ventilated cabinet, as I’m also toying with the idea of trying to FDM print ABS, which also requires ventilation.
Eye protection is also highly recommended. The resin can cause severe skin reactions- so imagine what it can do to your eyes. I wear glasses so I don’t bother, but if you don’t- you should at least wear some safety goggles.
The printers don’t come with any of this. They are supposed to ship with a pair of gloves and a couple of masks to get you started, but thanks to COVID-19, those are luxury items that aren’t included right now.
Cleanup:
For print/model cleaning and cleaning the printer and work area itself, the recommended solvent is IPA (Isopropyl Alcohol). Unfortunately with COVID-19 it is difficult and expensive to obtain, especially in the quantities you need for this hobby.
One of the best cleaning solutions for the printer itself is this stuff:
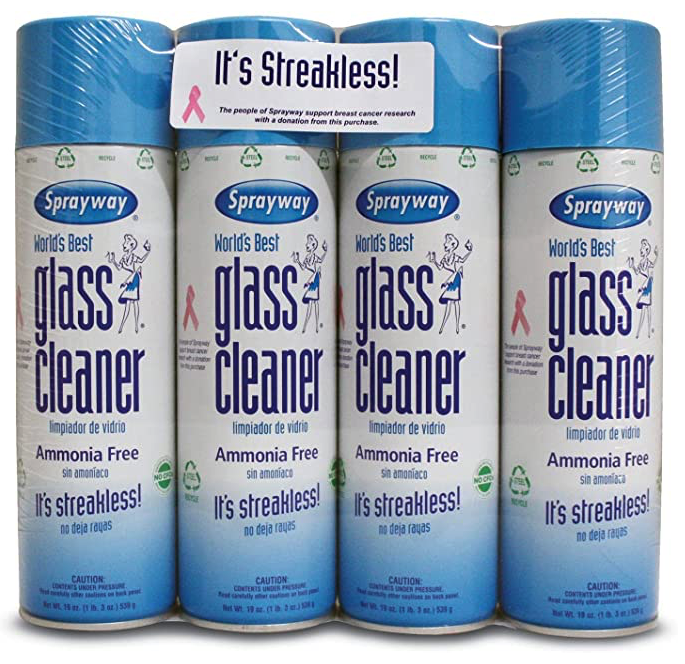
You can use it for the vat/FEP film, plate/mount, and actually the entire printer, along with all of your tools and work surfaces. It very-effectively dissolves resin. I haven’t tried using it for actually cleaning prints/models.
If you can get IPA- use it, it’s still the resin manufacturers recommended cleaning solvent. If not, you will find a lot of suggestions on YouTube. Most recommend denatured or grain alcohol, or “Green” cleaners, like Simple Green and Mean Green. Some are also using acetone with varying levels of success.
I’m currently using a combination of denatured “fuel” alcohol and “Simple Green” cleaner.
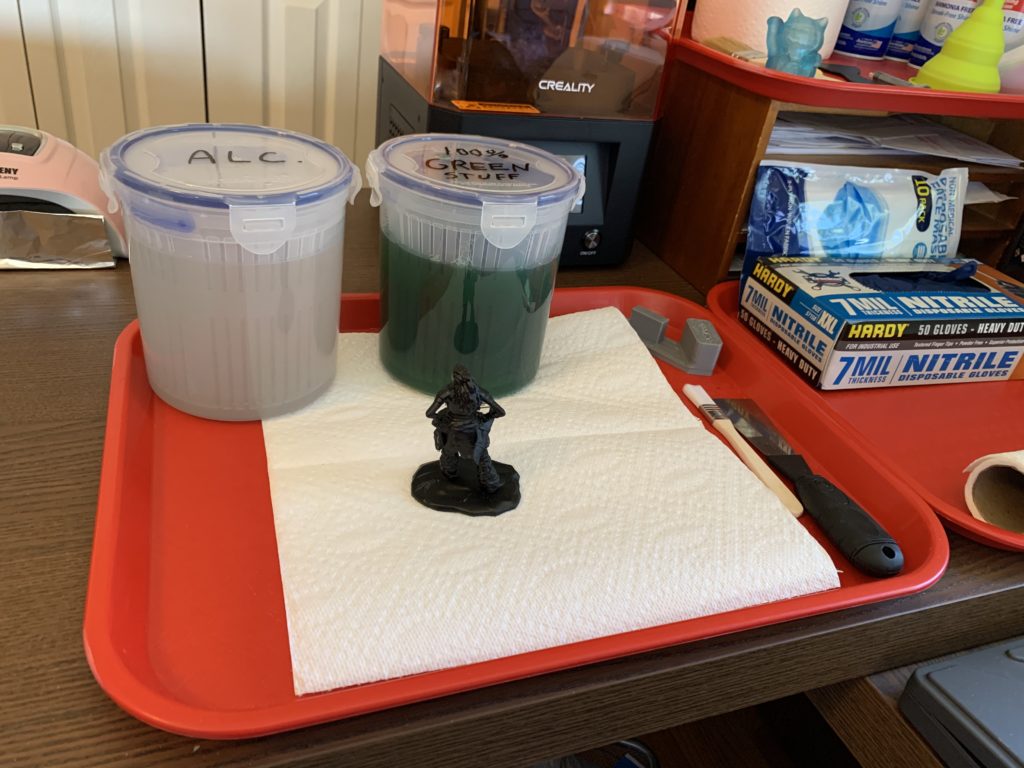
My process, in a nutshell is:
- Remove the print from the base. (Obviously.)
- If there are large supports- clip/remove them so they aren’t in the way.
- Dip and agitate the print in denatured “fuel” alcohol for 30 seconds.
- Transfer the part to 100% “Simple Green”.
- Let soak for 30 minutes, agitating occasionally.
- Transfer the part to a 25% solution of “Simple Green” in water in the ultrasonic cleaner. Run for 30 minutes.
- Rinse the part in running water. At this point it is clean enough to not worry about toxicity.
- Remove all supports. Clean up any support “zits” as much as possible.
- UV Cure.
This has worked well for me so far. You will need to experiment though.
I have used the newer water-wash resin as-well. All you need to do is soak and rinse it in water (I add a bit of dish soap). It is helpful to use a cheap paint brush (one was actually included with the resin I bought), to help clean out any crevices and opening in your print. After it is thoroughly cleaned, you can give it a final rinse in running water. You must contain and dispose of your initial rinse water accordingly- see the Environmental section below…
When finished- if I’m going to start another print using the same resin- I just start it. You need to make sure the build plate is completely scraped off and wiped off. Run you (gloved) finger along all of the surface to make sure there aren’t any bits remaining and it is smooth. You should also give the bottom of the vat a gentle scrape with the PLASTIC scraper to make sure there is nothing stuck to the bottom and no tiny parts or bits of supports have come off. You can destroy your printer’s LCD and damage the FEP film if there are any remaining plastic bits on the platform or in the bottom of the vat.
Otherwise- it’s time to clean the printer…
Start by wiping as much resin off of the build plate and mount as you can, then soak it in alcohol or with Sprayway for several minutes and wipe it down again. You want it shiny-clean. Then- install it back in the printer.
If you won’t be printing for several days- drain the resin out of the vat through a filter funnel back into the resin bottle, or into another UV-safe bottle, for re-use. NEVER just throw away resin! Wipe it out with a paper towel, and then use alcohol or Sprayway to thoroughly clean it. Pay close attention to the bottom edge- be sure you get all the resin out of it!
If you plan to run more prints from the same resin within a few days- just cover the vat with plastic and keep the orange/yellow cover on the printer. You just want to keep it protected from UV and dust. Otherwise- it will generally keep for days or even weeks this way. When you are ready to print- stir the resin up thoroughly with a plastic scraper or paint brush before you use it to print again.
Most recommend filtering back into the original container any time you aren’t using it. It’s just best for the resin that way, although it does waste some in the cleaning process for the vat.
Environmental:
Again, I can’t stress this enough- 3D UV resin is toxic!
Some manufacturers are selling “environmentally friendly” resins made of PLA or plant oils. These are “friendlier” but not really “friendly”. They are still toxic and need to be treated accordingly, they are just LESS toxic. You still need to wear PPE when working with them, and still need to dispose of all materials properly.
If you use water-washable resin- you must clean your parts in a container. Do not just clean excess resin off in the sink. After cleaning- leave the water container out in the sun for a good hour- this will solidify any resin in the water. Then dump the water through a fine strainer to filter out the plastic before either dumping the remaining water in your lawn or other reasonably safe area. Don’t dump down a storm drain- if anything dispose of the FILTERED water in your sink so it goes through a treatment facility.
Re-use alcohol and other chemicals as much as possible, and dispose of them properly when they are no-longer effective. “Green” cleaners can be processed the same as water for water-wash solvent (above). The cleaners themselves are environmentally friendly.
Alcohol and other solvents can generally dumped into a tray of cat litter or oil absorbent and allowed to dry outside before disposing in the trash.
Expired resin should be placed outside in the sunlight until it hardens, and it can then be disposed of in the trash. Any liquid remaining can be disposed of using absorbent as-above.
Obviously these are general guidelines. You need to follow all local disposal rules for potentially hazardous waste.
As a wrap up, here are some pictures of my work area:
Resources:
Most of the manufacturers have videos and tutorials online, which are a great place to start. There are also a number of 3D printing experts out there sharing their knowledge on YouTube. I want to recommend the following:
Uncle Jessy:
https://www.youtube.com/c/UncleJessy/videos
Great general informations and experimentation.
3DPrintingPro: https://www.youtube.com/channel/UCbv2mDrRqXovPdahRyoCFhA
Detailed printing techniques and analysis. Get the most from your slicer!
Dr. Zzs:
https://www.youtube.com/channel/UC7G4tLa4Kt6A9e3hJ-HO8ng
Great general information. Also great resource for lots of Tech DIY projects, including holiday pixels.
Prints:
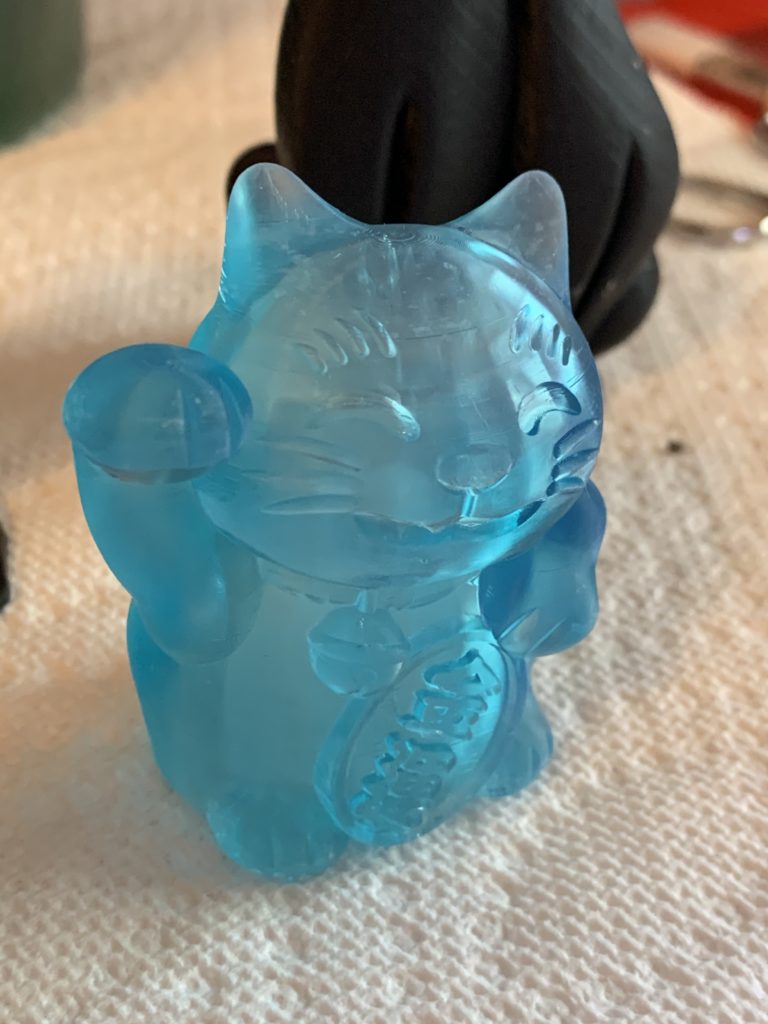
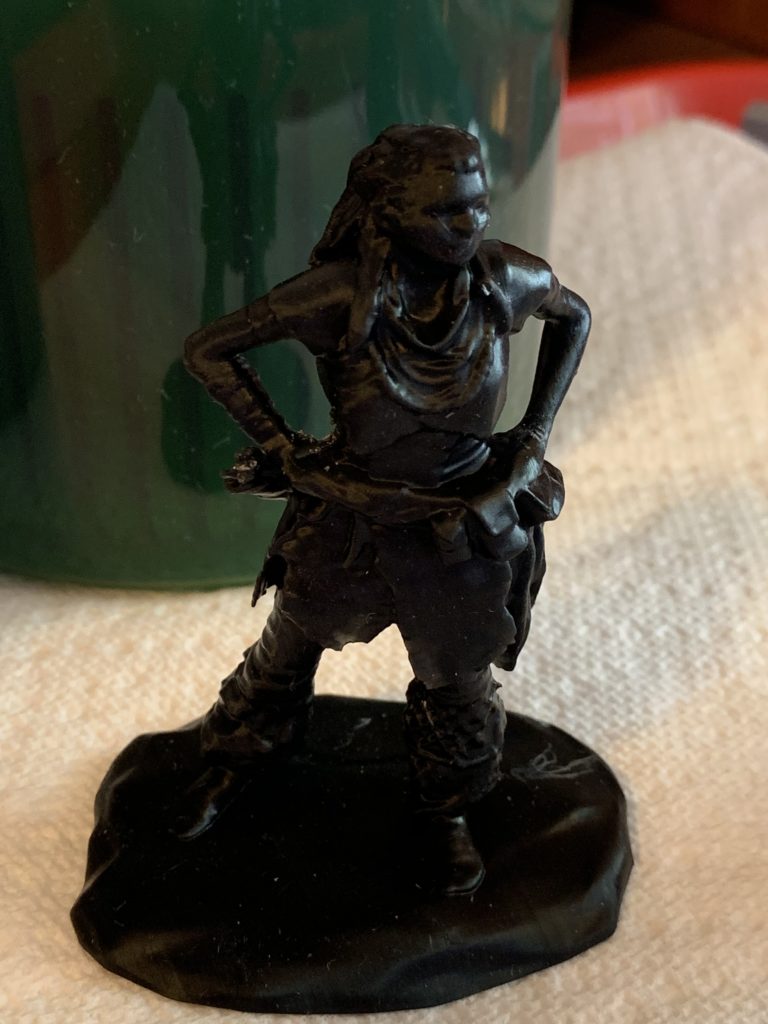
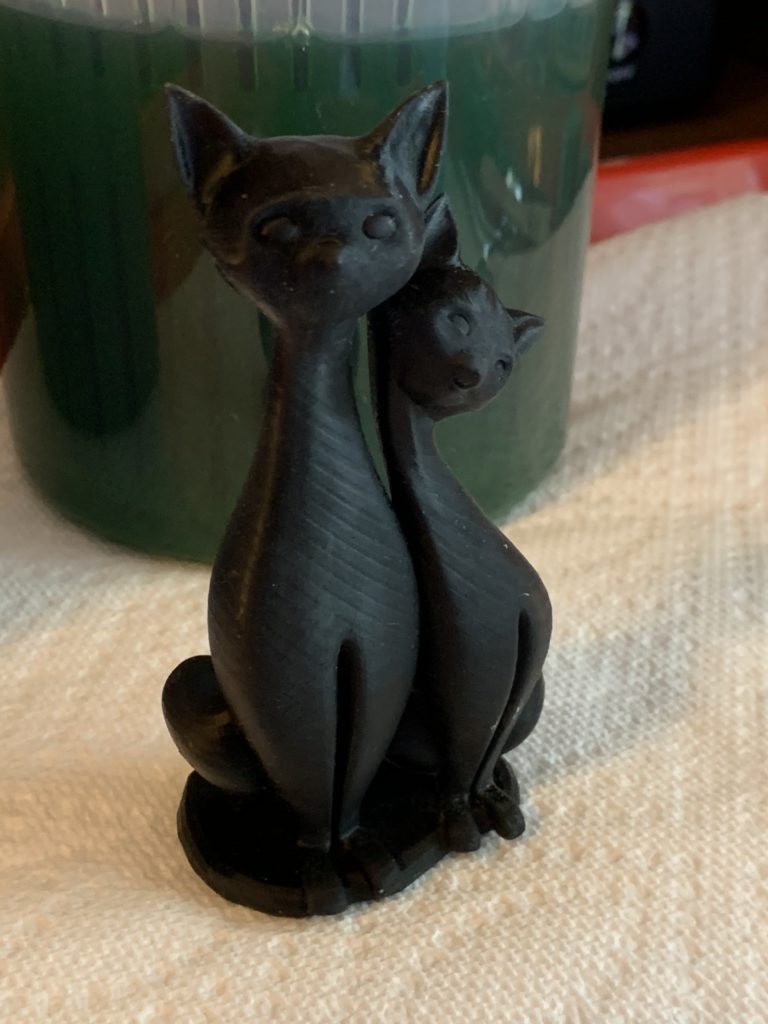
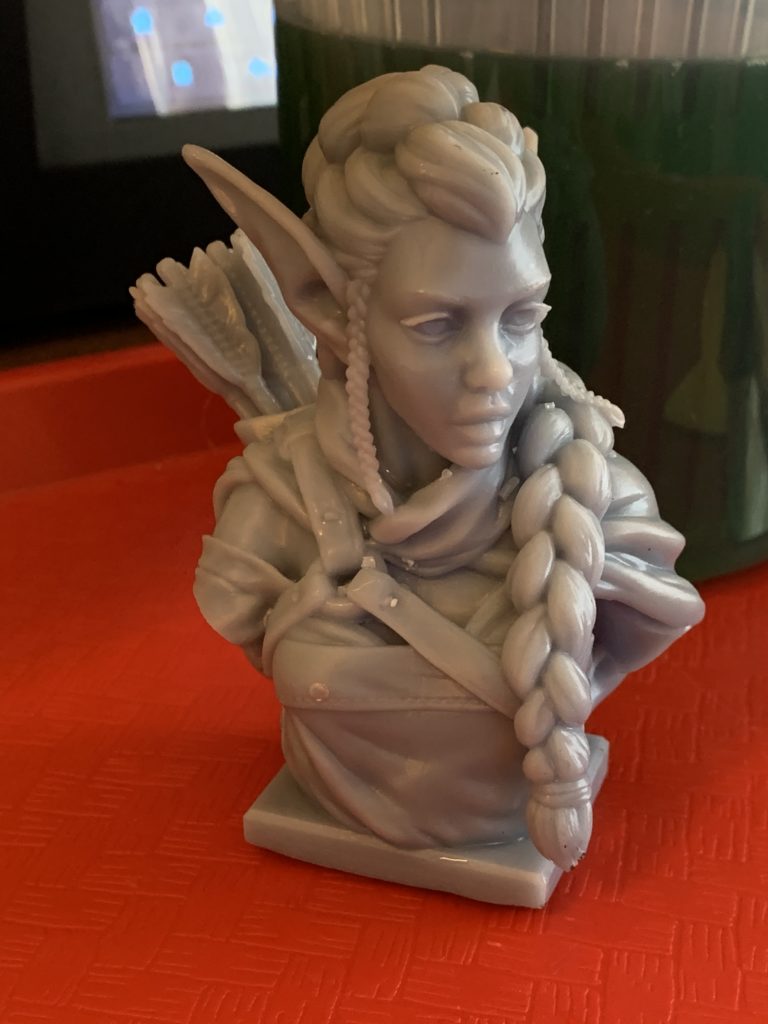
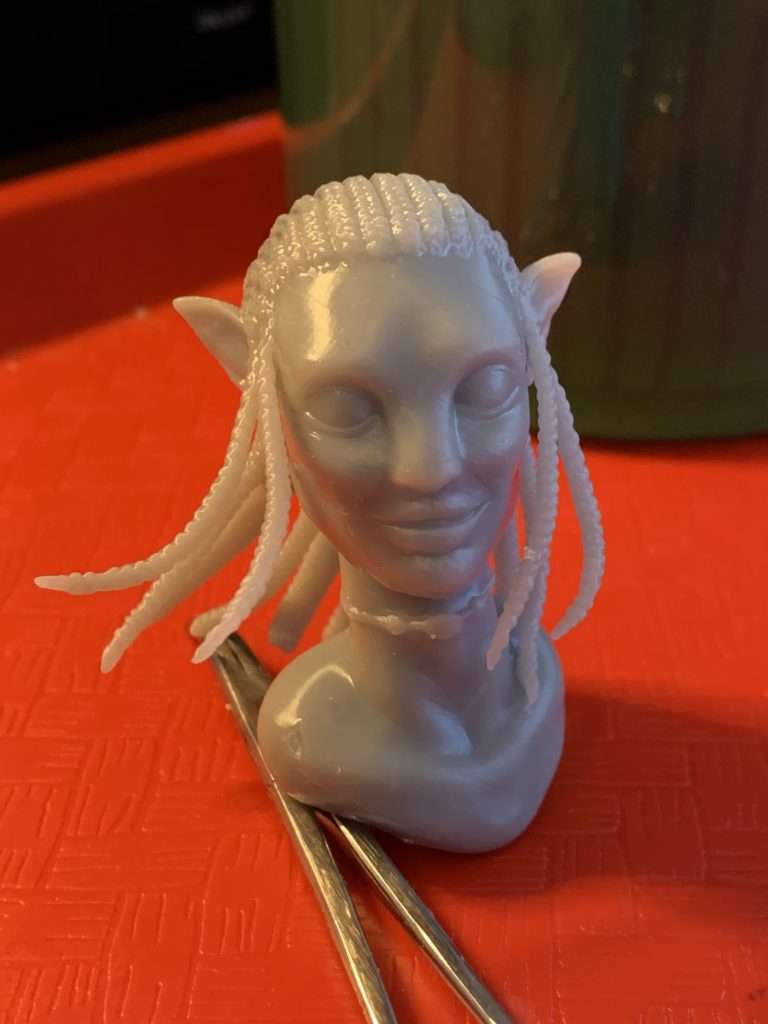
Some of the better ones so-far. I need a base for the Neytiri bust, which is why it’s propped up.
UPDATES:
I found a 405nm UV floodlight at a discount/surplus store for $6. I painted the inside of an empty paint can silver, and just like that- I have a new and improved UV curing station that can handle much larger prints.
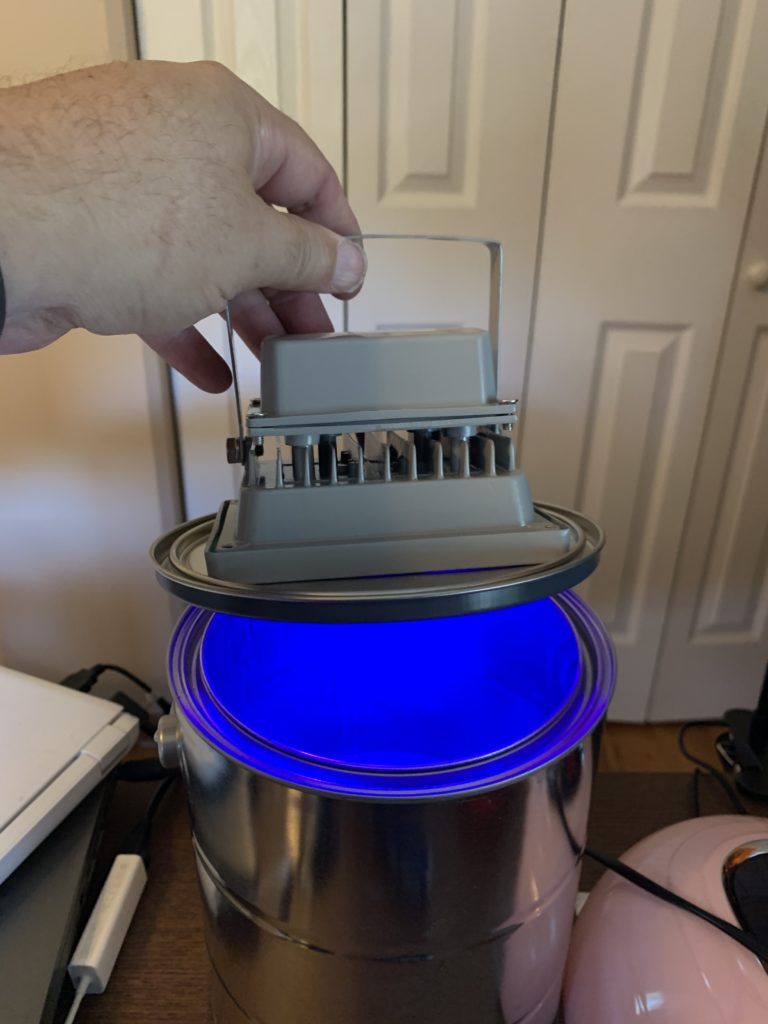
I ordered a $6 solar turntable too, which I’ll stick in the bottom to insure the best coverage.
I also noticed that denatured alcohol was NOT doing a good job of dissolving and removing uncured resin. It looked like uncured resin was actually just being spread around and re-deposited on other prints. There was a yucky layer of sludge in the container I was using for it as well. So- I have revised my process to use Acetone instead. I also didn’t really notice an appreciable difference between models just rinsed off after the first Simple Green soak and those that sat in the ultrasonic cleaner, so I have removed that step. I can see doing it for water-wash resins, but not for standard ones.
Current process (October, 2020) for standard resins:
- Remove the print from the base. (Obviously.)
- If there are large supports- clip/remove them so they aren’t in the way.
- Dip and agitate the print in ACETONE for 15 seconds.
- Transfer the part to 100% “Simple Green”.
- Let soak for 30 minutes, agitating occasionally.
- Gently brush details/crevices with a paint brush about half-way through.
- Rinse the part in running water. At this point it should be clean enough to not worry about toxicity.
- Remove all supports. Clean up any support “zits” as much as possible.
- UV Cure.
Current process (October, 2020) for water-wash resins:
- Remove the print from the base. (Obviously.)
- If there are large supports- clip/remove them so they aren’t in the way.
- Transfer the part to 100% “Simple Green”.
- Let soak for 30 minutes, agitating occasionally.
- Gently brush details/crevices with a paint brush about half-way through.
- Place in ultrasonic cleaner with 25% “Simple Green” solution.
- Run ultrasonic cleaner for 30 minutes.
- Rinse the part in running water. At this point it is clean enough to not worry about toxicity.
- Remove all supports. Clean up any support “zits” as much as possible.
- UV Cure.