Important Notice
This site is no-longer being maintained, and the content and links found here may be irrelevant and outdated. It is online for archival purposes only.
I mentioned before that I got a lot of information and inspiration from doityourselfchristmas.com and diychristmas.com. You will also find links there to countless other forums and discussions. You will find a LOT of debate about things like pixel counts and power, 5v vs. 12v, and the capabilities of various control systems. What follows is my own opinion. You will find many others, and your experience may vary.
Of course as I gain more real-world experience I will update or add to this.
One thing to make clear up front- everyone buys “cheap” pixels from mostly-Chinese suppliers these days. These are made with a wide variety of parts and materials, using chips often cloned from the originals. Some have higher-quality components and construction. One big factor is the wires used to connect the pixels. MOST use 20ga wire, while some better manufacturers use 18ga. (The smaller the gauge- the better!) This contributes to the first discussion- voltage and voltage drop.
Most wired pixels (actually all, I believe) use WS2811 chips, which are separate from their LEDs. They are packaged in clear plastic 12mm “bullets”, and have six wires coming out of them- 3 “In” and 3 “Out”. These are simply the power and data lines. They are serial data circuits, and are quite ingenious. You can read in detail about how they work online, but the short explanation is:
The controller sends out a set of packets that tell each pixel what to do. There is one “packet” for each pixel in a string. If there are 100 pixels, the controller sends out 100 packets, followed by a pause. It then sends out the next set of commands as another 100 packets. The cool thing is the way the pixels handle these. The first pixel (WS2011 chip) reads all of the packets, but only uses the first one. It lights the LEDs according the the instructions, and then sends every thing BUT the first packet down the line to the next pixel. That pixel does the same thing- taking the first packet of data it gets (which is the 2nd one sent from the controller), and sending everything that is left down the line to the 3rd. This repeats until all of the pixels have received their instructions. The controller could actually send more than 100, but only the first 100 instructions would be acted on because that is the number of pixels along the string. Each pixel also amplifies and cleans up the digital data that it retransmits, and it does this at extremely fast “network” speeds.
There is a lot of debate about how many pixels you can actually run at once (or on one “channel” or “controller”. I want to outline some of the factors that contribute to this…
Voltage Drop (5v vs. 12v):
You can buy neopixels in either 5v or 12v configurations. The difference is really how many of them you can power in one run. Generally- you can run over 2x as many pixels at 12v as you can at 5v. This is primarily due to voltage drop on the wires. DC current is not efficient over long distances, and experiences voltage drop over long wires. Any leads between your PSU and display also contribute to this. Exactly how many pixels you can reliably power depends on the manufacturer and condition of the pixels (see above), so unfortunately there is no hard-and-fast rule.
So what is the general rule? Most say you need to add more power every 50 pixels for 5v ones, and 100 pixels for 12v. Of course- this can vary wildly depending on on the factors above. In some cases it is worth just experimenting… Set all your pixels to full white (if your PSU can handle it), or at least as white as you can. Start with 50, or 100, and add more in 25 or 100 increments. When the white lights start to turn pink or amber- that’s where your limit is. You can actually add about 1/3 more, but then you have to add additional power before continuing. You can do this by splicing it in, or by using commercially available “Y” connectors for power. There are some very important rules here. First- don’t touch the data line. It needs to continue on. Connect the SAME power supply, and connect it to both the incoming and outgoing string. Obviously be sure to keep your polarity straight or you will blow a fuse and likely burn out some of your pixels at-best. NEVER connect different power supplies to the same string.
You may find too that it is best to design “features” or individual decorations so that the pixel strings loop around so they begin and end at the same place. That way you can connect power to both end without the need for a lot of extra wire. Just remember to only connect the data wire once on the D-In side.
Another factor in the 5v vs. 12v discussion is cost. It actually ends up being a wash for the most part, but your mileage may vary, so to speak. Right now 5v and 12v PSUs of comparable wattages cost roughly the same. Costs vary wildly based on quality and supplier, just like everything else though. The neopixel strings themselves are a bit cheaper though for 5v, but only about 10-15% on average. You end up losing that savings in extra low voltage wire for power injection though, at least potentially. If you have a lot of long-straight runs- you are probably just running a parallel power-injection wire or wires in either case.
One thing that can add a little bit more to the cost of a 12v system is the controllers themselves. Commercial controllers run off mains voltage and have their own power supplies, but many people (including me) use microcontrollers that need their own 5v power supply. If you are already running 5v for your display- that’s a no-brainer. If you are running 12v- you need a separate 5v supply. I’m just using cheap buck converters to drop the 12v to a regulated 5v for my new controllers (still a work-in-progress). If you are using an Aduino-style controller- many have a 12v barrel connector and 12v “V-in” pin with their own voltage regulator- so you can just use 12v anyway. More on controllers below.
I prefer 12v just because in a lot of cases I don’t have to worry about power injection. I can run over 200 pixels without worrying about it, and likely as many as 300 if I keep buying them from a supplier that uses 18Ga wire.
Power Supply (PSU):
Most common 12v PSUs are around 350w (~29A). You can get them for around $25 each. I like “MeanWell” as a brand myself, but there are many others out there, all likely from the same factories. I use MeanWell’s in 3D printers, and have found them to be reliable and well-built. I’ve had a couple of other cheaper brands fail (fairly spectacularly, in fact).
(Something obvious: Clearly not weatherproof.)
PSUs should be able to run at their full rating. Most these days are cheaply-built though, so working them at 100% all the time will likely lead to failure. Always be sure to fuse the heck out of your circuits as-well. High current DC circuits can be much more dangerous than similar 120v AC circuits.
Let’s break out some math…
The rule of thumb on neopixels is each pixel uses 60 milliamps, or .06A. Some use less. There are some micro versions that use less than .04A, but these are more suitable for costumes or small decorations, and not yard/house decorations. So- for a PSU rated at 29A:
29A / .06A = 483.33…
So, at most you can run 483 pixels at full white brightness on a 29A PSU. Most will actually push that to 500.
There are, of course, tricks that most people use to run more pixels on the same amount of power. First off- the easiest thing to do is never run full 100% white. That is blindingly bright with these pixels anyway. If you want to do white- you can do it at 70%-80% brightness and it will still be effective. So- you could run up to 30% more LEDs if you limit the brightness, especially of white. Brightness and power usage aren’t exactly linear, but the power usage of the LEDs is also a maximum, and real usage may be less anyway.
Many people design their shows to minimize the amount of power needed, and can drive 1000-1500 or more pixels off that same 29A (some are actually sold as 30A) PSU. If you actually dig into the specs for the pixels- each color draws a different amount of current at maximum brightness. If you really want to optimize your power usage- you can figure out what each color you want to use actually takes, and design around it.
My philosophy is- fuse everything and experiment. Put a 25A fuse between the PSU (assuming 29-30A) and your controller/pixels, hook up a reasonable amount of pixels (1000 will likely work fine), and run your show/patterns. Really, as noted before- the only time you will ever draw full-power is 100% white (R+G+B), and for most of these pixels- that is VERY (Blindingly) bright. While you ALWAYS need a fuse- you can also hook up a current meter if you have one so you can get a much better idea of what is going on. I’ll say it again- ALWAYS use a fuse. Keep it less than what the PSU is rated for. Most will have an internal fuse as well, but it is usually soldered-in and you don’t want to have to replace it.
Pixel Control/Memory:
Another big factor in the “how many” discussion is driving the actual pixels themselves. In computer terms- each color in an RGB pixel uses 1 byte of memory, so one pixel constitutes 3 bytes of data. That 3 bytes needs to be stored on a computer/controller and transmitted to the pixel. So, 100 pixels is 300 bytes, 1000, is 3000 (3Kb). In modern computer terms- that’s not a lot to either store or transmit, but when you are dealing with microcontrollers- that’s a lot of memory. Also- general purpose computers have a harder time outputting data at high frequencies, which is what these pixels love to get, and that is why most use microcontrollers to drive them. They are much more efficient, and a lot cheaper.
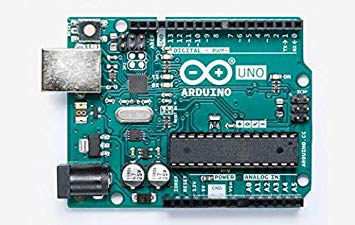
Arduino Uno
An Arduino Uno has 32K of Flash memory (where it stores programs), but only 2K of SRAM (system RAM). Because of this- it can only drive a maximum of 666 pixels (2000/3), although since some memory is used for buffering and caching it is actually much less than that. My understanding is 500 is a more practical limit. You can buy Arduinos with more memory (such as the MEGA), but they cost quite a bit more, and in reality- while these well-loved and well-supported microcontrollers are great- they aren’t really the best choice for a large display. You can run several pixel strings off of one data line, since it uses almost no actual current, which is great if you just want to run a specific pattern on a pixel tree (for example) where each strand is exactly the same. You can even get creative and cascade strings at different points, using a combination of the WS2811 (and similar) chip’s data transfer capabilities and sending extra packets of data from the controller. This is pretty advanced though, and could just turn into a mess if you don’t really know what you are doing. You still have to deal with the pixel limits of the controller itself, but you can run more physical pixels from it (albeit with the same patterns).
The better options:
Really- if you have the money- the best way to do this is to buy into a system like Light-O-Rama or Falcon. These are tried-and-true systems and are designed specifically for controlling holiday light displays. Many are based on, or derivatives of, DMX which is a digital lighting control standard has been used in professional stage, event, and venue lighting for decades. They have stand-alone controllers that can control both neopixels (“smart” pixels”), “dumb” RGB LEDs, and old-school flood and string lights. (The latter can easily be controlled by a Raspberry Pi (or Arduino) and a bit of extra hardware.) They are almost plug-and-play, in that you still have to sequence your show on a computer and might need some extra modules depending on what you want to do, and can be purchased with weatherproof enclosures.
One advantage I see with these commercial solutions is they support wired Ethernet networking, while the options below are WiFi only. I acknowledge that WiFi may be a limiting factor here, but it is certainly working for enough people that I believe it is viable.
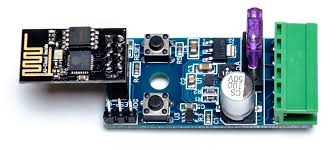
For me- I don’t have that kind of money, and want to slowly grow my show over time. If you are adventurous, decent with a soldering iron, and have some electronics and computer background- you can roll your own controllers for less than $10/channel. Actually- more like $5 if you order parts in bulk and don’t mind a LOT of soldering. Most of these are based around the ESP8266 microcontroller. Probably the most famous project is the ESPixelStick and related PixelPops. You can find out more information about these here:
https://www.doityourselfchristmas.com/wiki/index.php?title=ESPixel_Stick_%26_ESPixel_PopsAssembled ESPixelStick
If you don’t want to buy the boards and components and solder everything together yourself, you can often buy pre-assembled ESPixelSticks from
Amazon.com. They are reasonably priced and very easy to work with. They often have limited availability, especially in the months leading up to Christmas, so if you are interested in an inexpensive pre-assembled and tested option- buy them when they are in-stock:
What these little boards do is connect to a dedicated WiFi network, where they receive their “show” data via E1.31 streams, which are DMX over IP Network/WiFi. Then they interpret the data and send it out to the neopixels. It’s really as simple as that (well, in a nutshell). So- you can have, say 1000 pixels, connected to a power supply and tiny little WiFi controller. You can have a whole bunch of these, all connected by WiFi to your computer, which is then running your “Show”. The show can be something fancy- like synchronized to music or video, or it can just be a bunch of choreographed patterns, or both/all.
The great thing is- these tiny little controllers are easy to fit into a weather-tight container. They will to fit inside 1″ PVC pipe, which can be incorporated into an individual display component, or can be capped off and made waterproof.
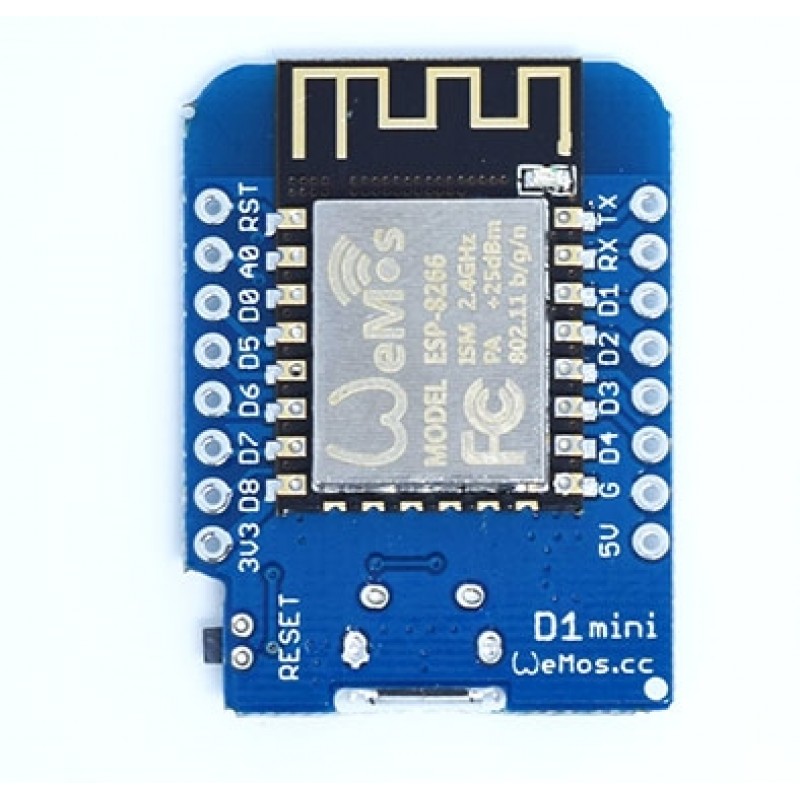
A popular alternative to the ESPixelStick or Pop is to use a “D1 Mini” WiFi controller board. These were originally made by WEMOS Electronics, but have since been cloned by dozens of Chinese manufacturers. They have a built-in MicroUSB port, which makes programming them very easy, and a built-in WiFi module and ESP8266 microcontroller. The advantage to the D1 Mini is its small overall size, and cheap price (usually less than $3). You don’t need headers for it either- you ultimately just need to solder 3 wires to it!
D1 Mini: ESP8266 w/ WiFi and USB data/5v regulated power.
The disadvantage to the D1, over ESPixelSticks, is they can only accept 5v, which makes life more difficult if you are running 12v pixels like I am. In order to run it on a 12v system, you need a 5v buck converter, like this:
Tiny USB buck converter 6-26vdc to USB 5v regulated.
Thanks to it’s open-source nature- you can load the same ESPixelStick firmware on the D1 Mini, and other ESP8266 hardware. Another option (in case you are an electronics hobbyist and have some lying around, is to use the popular NodeMCU controller. It’s a more-expensive larger cousin to the D1 Mini.
My plan is to use a bunch of these D1 Mini controllers, one for each element or string in my display. Because I use 12v pixels, I’m going to use a cheap buck converter to provide 5v power to them. Both will fit in a little piece of PVC tubing with caps on both ends. The each controller, including the buck converter, wire, and PVC case, will cost less than $10. For practical reasons, mostly speed/refresh rates and power, I’m going to limit these to 500 pixels each. The controller (actually ESPixelStick firmware) is actually able to control 4 “Universes” of DMX data for a maximum of 680 pixels. (A DMX “universe” is 512 channels. Each pixel takes 3 channels.) The cool thing though is- it doesn’t really matter all that much- since multiple controllers/pixel strings are all coordinated and driven via WiFi. I’m not sure what the practical limit is right now, but I can imagine that dozens of these things can be operating at the same time on a dedicated WiFi network without a lot of interference.
I’m going to go more into actually doing this in my next posts…
You might also like...