
Info Matrix (2021)
Important Notice
This site is no-longer being maintained, and the content and links found here may be irrelevant and outdated. It is online for archival purposes only.
Last year we did a “Tune In” Matrix under our carport roof. It was my first DIY matrix, which actually turned out and worked pretty well after going through three revisions. It was functional, but just didn’t fit in well with the rest of our display and I wanted something with more resolution.
I decided this year to “play” with P10 display panels. These are more-commonly used to build things like RGB scoreboards, billboards, and other advertising displays. Actually P5 panels with twice the resolution are used most often in these now, but I chose to go with the less-expensive P10s for now.
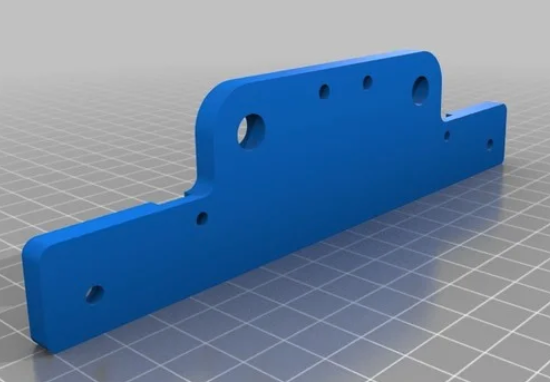
The 10 in P10 refers to the pixel pitch. The pixels in a P10 are on 10mm centers, while a P5 has pixels on 5mm centers. Both panel types are the same size, a little larger than 6″w x 12″w. A P10 is 16 x 32 pixels (512), while a P5 is 32 x 64 pixels (2048). The panels come in “Indoor” and “Outdoor” rated models (more on this in a bit), and can be mounted in a variety of ways. I chose to use 3D printed mounting brackets, but panels, brackets and other hardware are available from many of the hardware suppliers here: Pixel Resources
I buy mine from Wired Watts…


The panels themselves can be combined into almost any shape and size you want (as long as you can make it out of rectangles. Commercial displays use dozens or even hundreds of them. Pixel hobbyists are usually a bit more conservative, mostly because of the cost. Some build displays for their roofs or windows, or build stand-alone prop displays out of them. Generally P5 panels are used for close-up displays where the higher resolution is necessary, while larger distant displays are usually made with P10.
You want to compare the costs and consider what you plan to display on them, as in many cases- a projector or HDTV setup may make more sense for HD/Video content, although many do display video content on displays made out of P5s. For example- right now a 4’x5′ P5 “interior” display would cost about $500 for the panels (40), mounting hardware, and controller hardware, not including any enclosure and protection from the elements if used outdoors. A projector and screen would cost less than half of that and would be able to display full-HD video. A 4’x5′ P5 matrix, while impressive, is still only 256×320 pixels, not even “SD”. But, I digress…
What I wanted was a reasonably-high resolution display that is short and wide. I wanted something that would blend in better and wouldn’t look as out-of-place as the matrix we used last year. I also wanted something long with a higher resolution that would display more readable text at once, without having to scroll everything. I decided that P10 panels would be best- they are cheaper and the resolution is more than sufficient for the viewing distances involved.
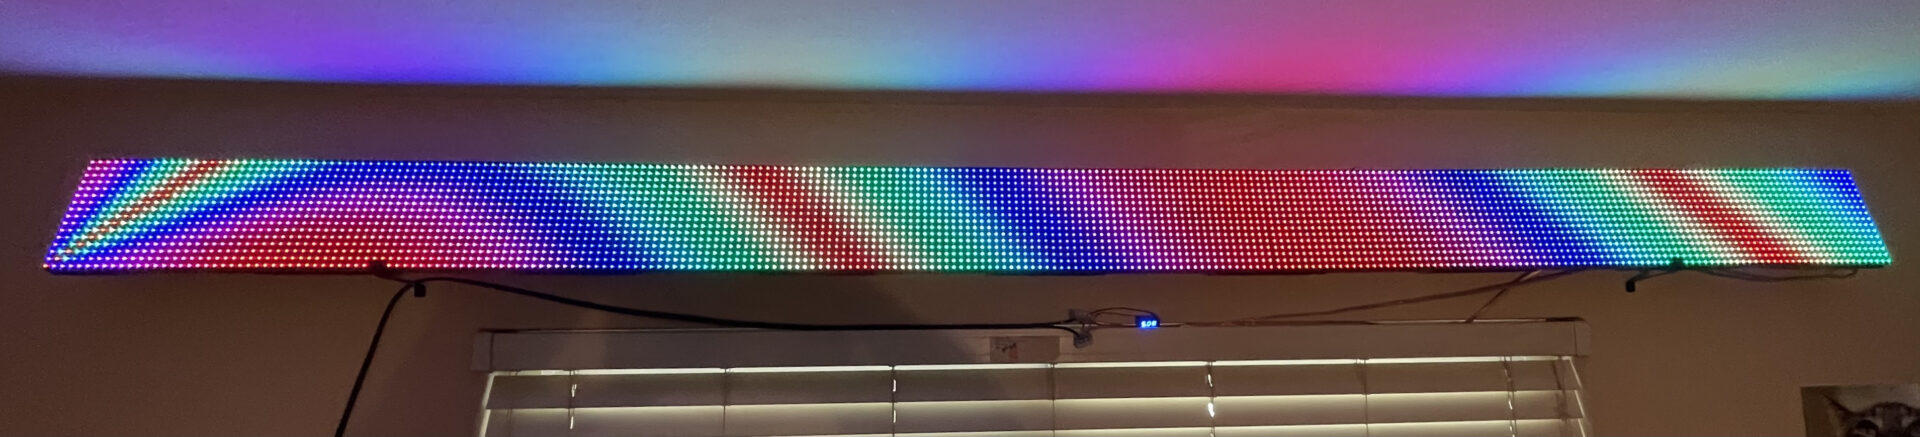
So, I decided on a 1×8 P10 configuration. Really easy to set up, and can be driven from one controller port. Here is a test display I put together:

Here is the concept, mocked-up in xLights:

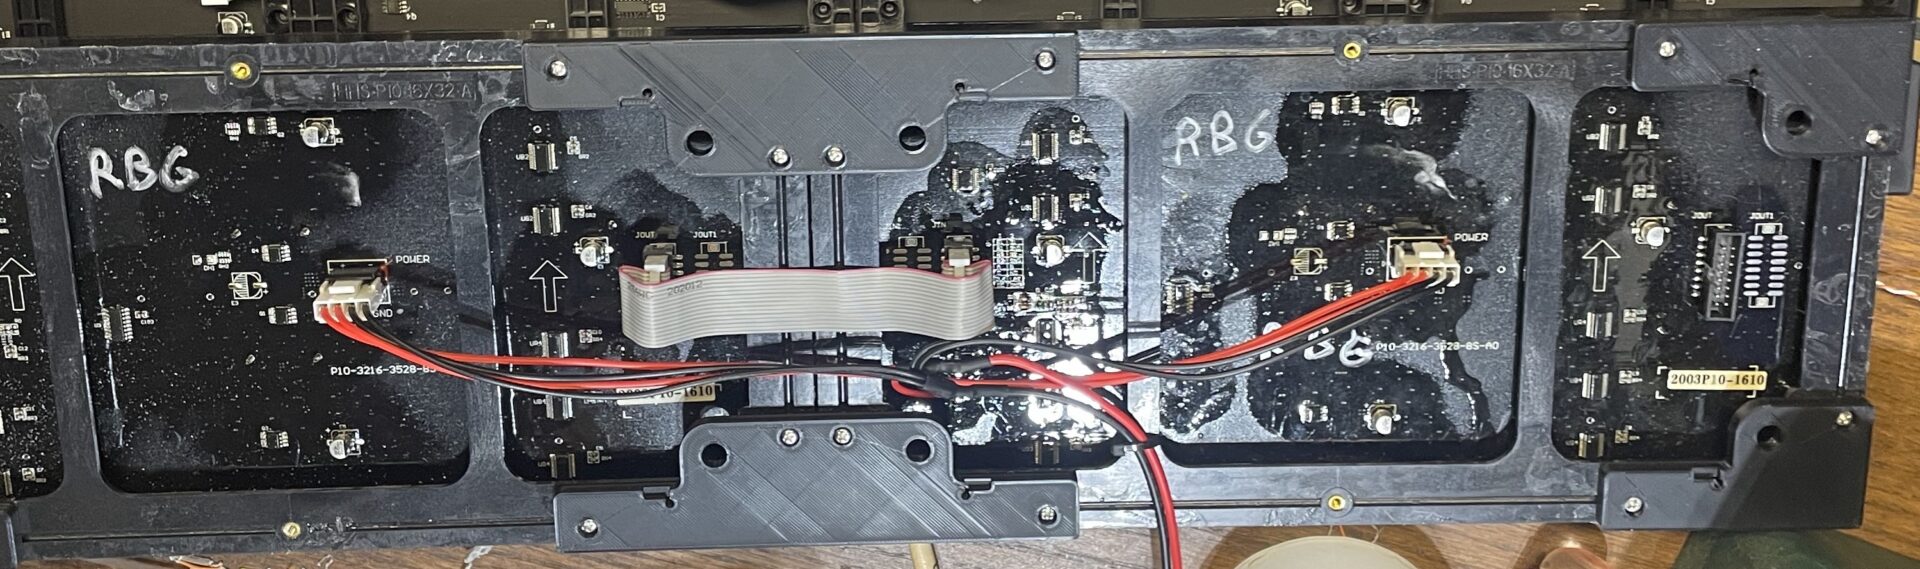
The panels are linked together using 3D-printed plastic mounts and stainless-steel metric 3mm screws:
As I noted earlier- pre-made mounting hardware and complete mounting kits can be found through several of the vendors here: Pixel Resources
It’s important to note that these panels can’t be controlled directly by our “usual” WS2811 pixel controllers. They take special controllers with “HUB75” outputs, using 16-pin ribbon cables and connectors on the controller and between the panels. You can daisy-chain panels, the number of which depends on the panels and controller. Most controllers have 3-8 outputs, each one capable of controlling 8-12 daisy-chained (P10) panels.
There are a number of manufacturers of controllers. I am looking at a few other P-panel projects and have experimented with the following:
Panel Pi Hat, by Hanson Electronics
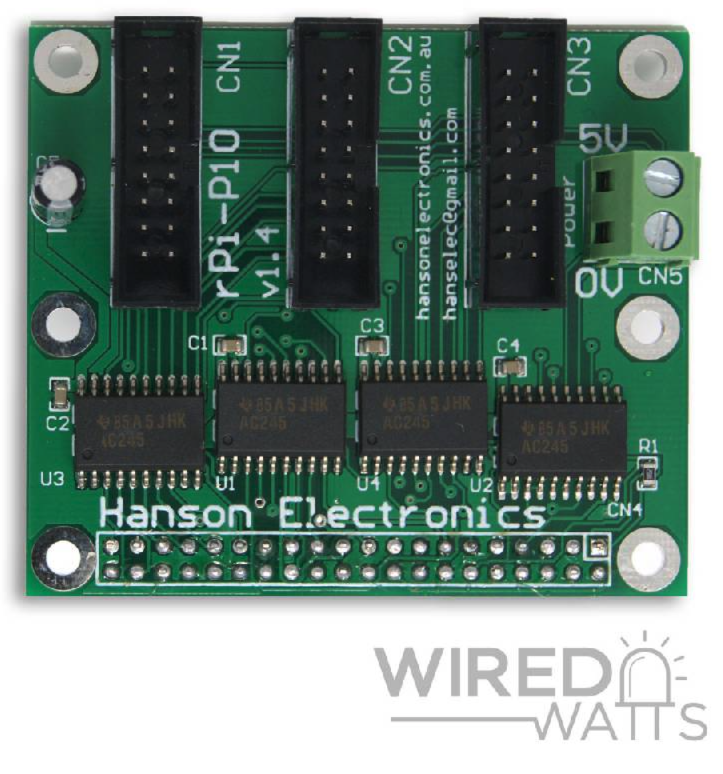
Great little controller that runs on a cheap Raspeberry Pi SBC. Load FPP on the Pi and you have a complete controller with a sequence player. Because of RPi limitations- it only has 3 outputs, but that is enough for a few dozen P10 panels.
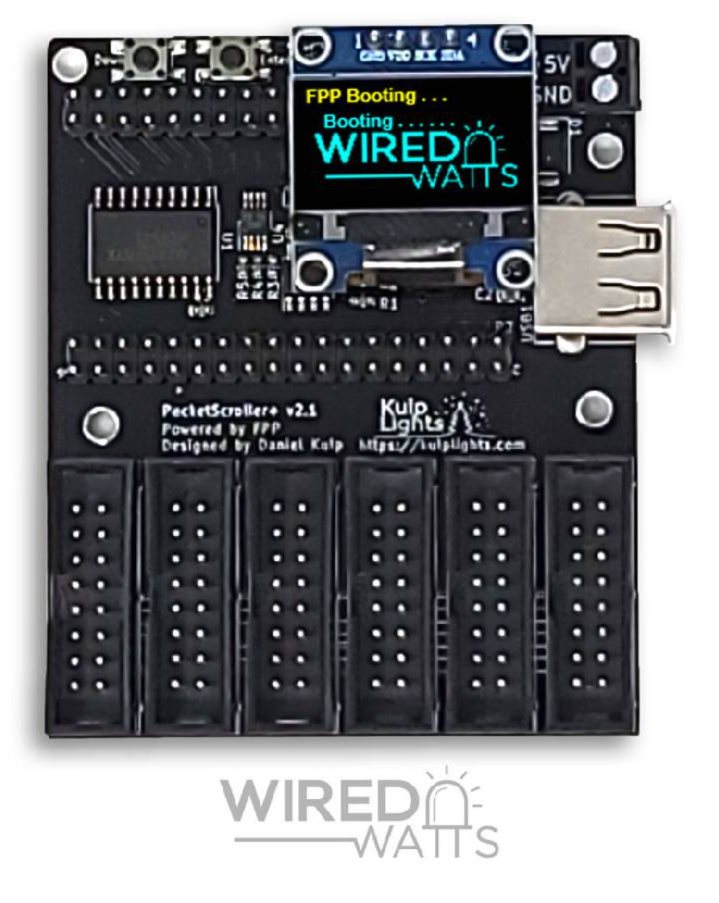
Pocket Scroller, by Kulp Lights
An older, and still popular, controller card is called a Colorlight. It doesn’t have FPP on-board, but can receive E1.31 data from a separate controller. It requires special software to program it, and a wired Gigabit Ethernet connection for data. Because of this, I personally chose not to use one. It has 8 output ports and is more of a “pro-grade” alternative though.
The PocketScroller is what I am using for this particular project. It uses a more-expensive Pocket Beagle SBC as a controller, but also runs FPP giving you a complete solution. It has six outputs which can support up to 72 P10 panels.
As I mentioned there are “indoor” and “outdoor” rated panels. The only real difference is the FRONT of the outdoor panel is waterproof. The backs of neither are, and you have to build some kind of enclosure.
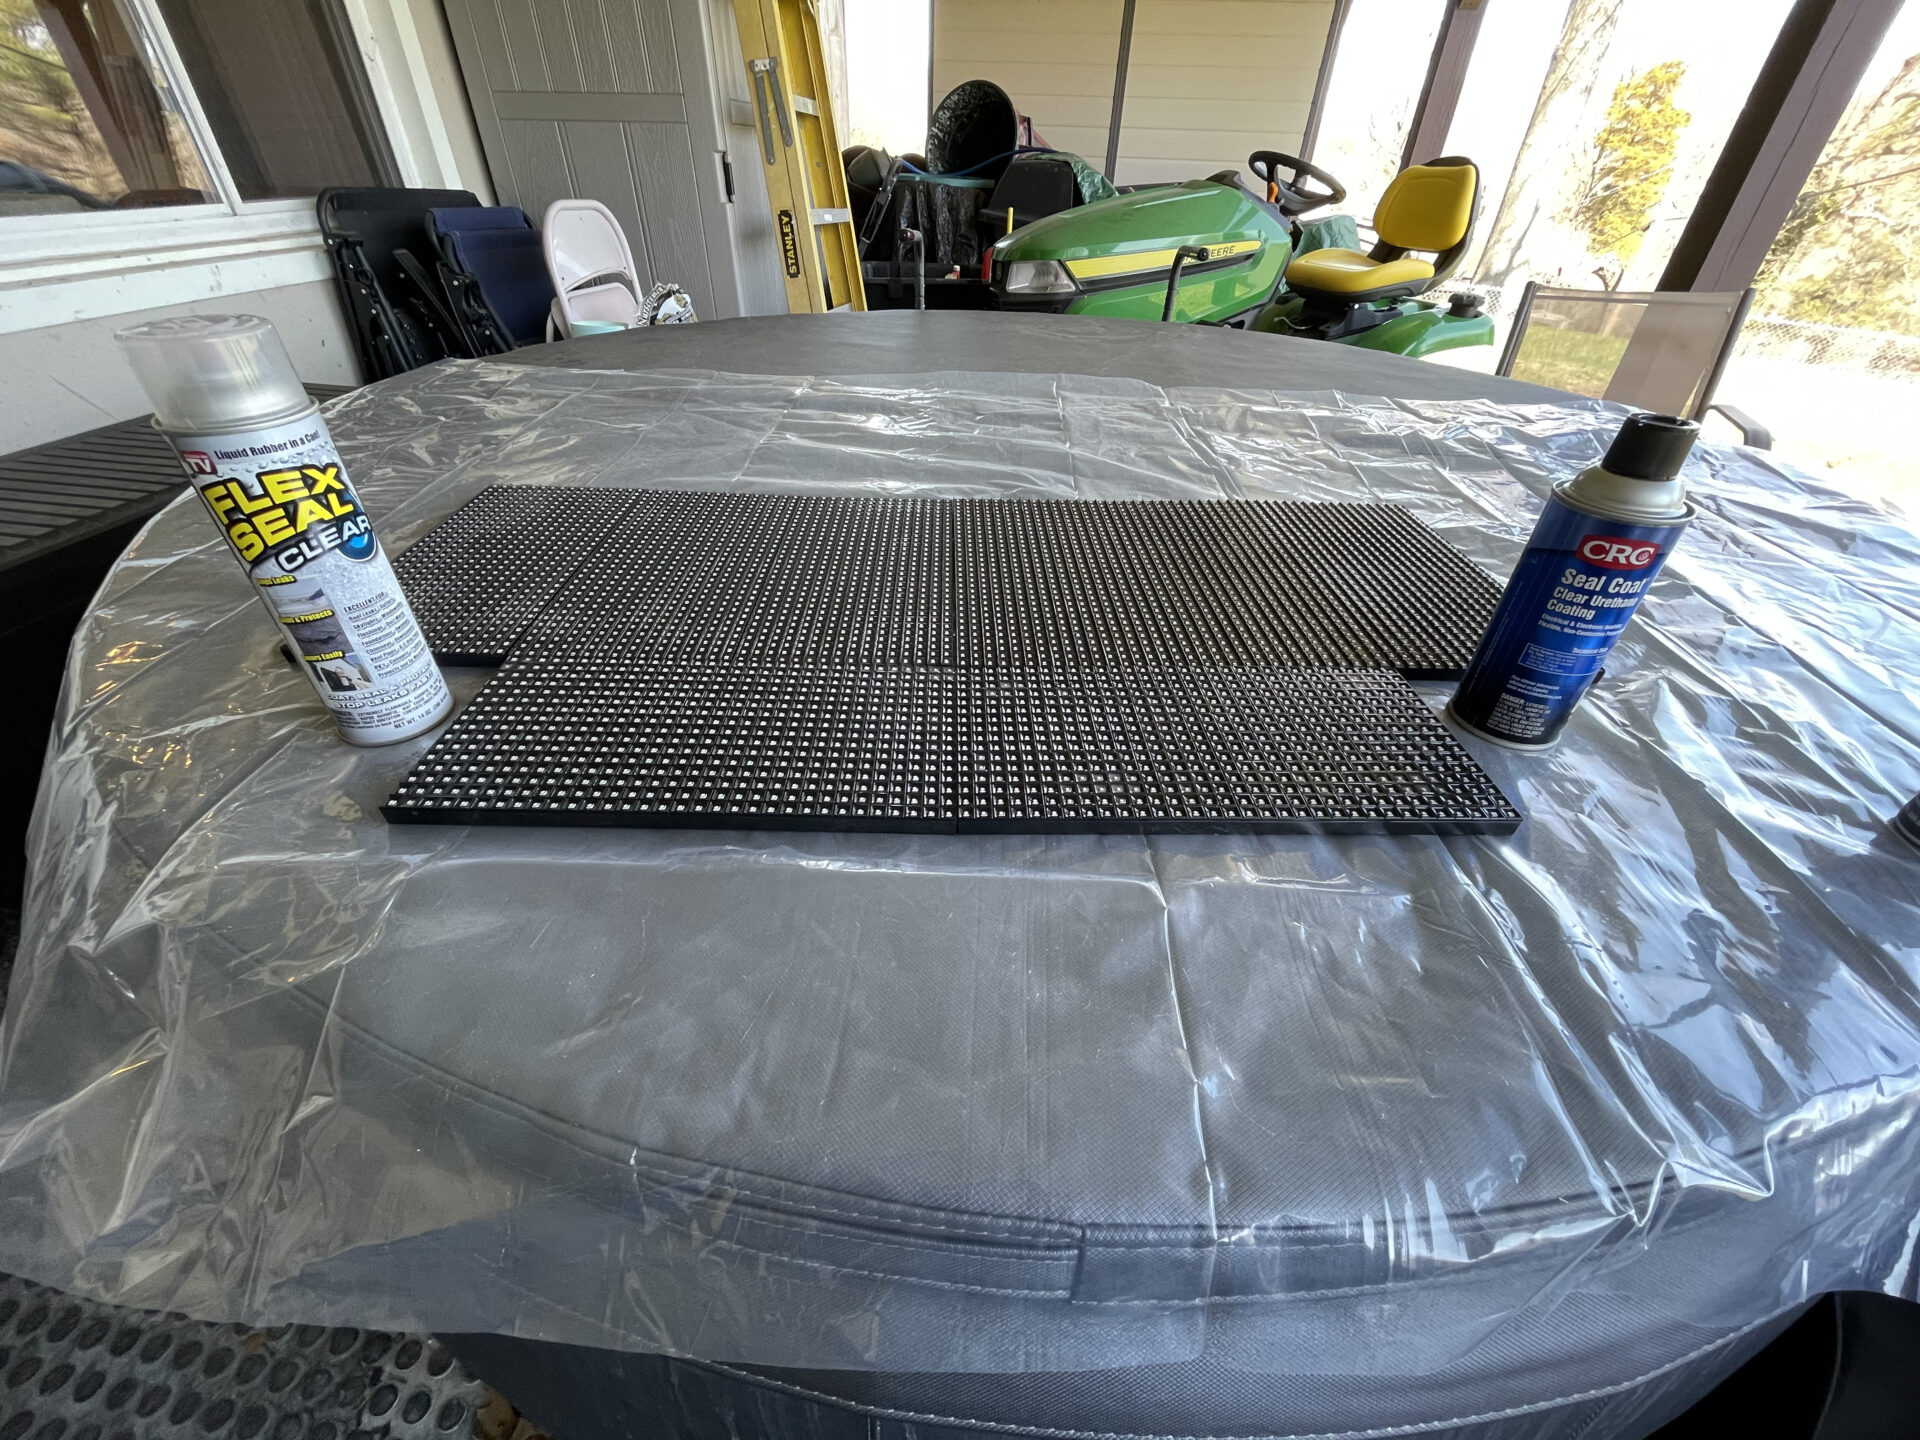
Now, of course, I’m cheap and the panels will be mounted under the roof of our carport, largely out of the weather, so I thought I would experiment with trying to weatherproof “indoor” panels enough for me to just hang them under the eaves. What I decided to do is use a “Conformal Coating” for the rear electronics:
And, my old-faithful Clear Flex-Seal for the front:
I applied several coats of the Urethane Seal on the electronics on the back of all panels. Here are two, also showing power and daisy-chain ribbon cable:
And four coats of Flex Seal on the fronts of them:
So here is where I say- DON’T DO THIS!
It’s just a waste of time and money.
While it seemed like a good idea at the time, and the conformal coating on the back of the panels certainly won’t hurt anything, you just can’t seal the fronts of the panels effectively with any kind of a spray. The gaps in the plastic around the LEDs are just too big. Also, while the ribbon and power cable connections would probably work fine with my weatherproofing “secret weapon” (dielectric grease), I just wasn’t confident that any of this would work if it got wet.
So, this left me with another problem- building an enclosure for a row of panels almost 8.5″ long. (The panels are metric, so are really slightly larger than 6″x12″.) While the frame material wasn’t really a problem, the front was. It is almost impossible to buy a 8.5′ long piece of acrylic, which is what most folks use for the front of their panel assemblies. Generally the largest piece you can get is a 4’x8′ sheet, and while that is expensive enough, if not available locally- shipping can more than double the cost. I would need a seam somewhere in it as-well, since 8′ wouldn’t be long enough, which would result in a visible distortion line in the display.
I was thinking about alternatives, up to and including dipping the panels in sealant and allowing it to soak in behind the front plastic. I also considered trying to disassemble them (don’t!) to try to get the front circuit board and LEDs sealed. Of course, I could have also just bought “outdoor” panels to begin with, for an extra $40 in this case.
Then I had a little “eureka” moment. My employer is involved in the signmaking industry, including window signs and vehicle wraps. Clear sign vinyl! It’s outdoor-rated and completely waterproof. Best of all- it’s not all that expensive, and thin-long self-adhesive sheets of it are readily available in rolls for crafters with vinyl cutting machines…
It is harder to get rolls wider than 15″ at retail, but you may be able to buy larger sizes through a sign shop that does vinyl signs, or on eBay. Lots of times sign shops will have leftovers from larger jobs that they usually use to make decals out of. You can also overlap the narrower size with minimal transparency loss. Another alternative I’ve heard some use is clear “Marine Vinyl”, which is used for windows in boat covers and canopies.
So, on to building my cheap-easy enclosure…
All I did was use 1″x3″ PVC trim board to build the frame. I got it at Menards, but it should be available at any home center. It’s strong, and doesn’t need to be finished or painted at all. I used a dado blade in my table saw to cut a shallow (approx. 2mm) 3/4″ channel the whole length of several 8′ sections. This is enough to accommodate the thickness of the panel and plastic mounts. I bought 4 “sticks” so I had plenty for this and possible future projects.
I cut them to length to wrap the panel assembly, locking the panels into the channel after I wrapped the front of them with the self-adhesive vinyl. Since the trim is sold in 8′ sections, I had to extend the top and bottom pieces about 5″. I just uses some straight metal “repair brackets” to connect the extensions- cheap and easy. I pre-drilled and screwed the corners together with galvanized deck screws, and added a few brace sections on the back.


I decided early-on to mount the controller and power supplies in separate enclosures. I didn’t want to add to the weight and thickness of the panel enclosure itself.
One thing I found out while working with these is the panels use a significant amount of power, up to 3A each. The significant and highly-variable power requirements can result in unstable power for the controller itself. The panels and controllers all run on 5v DC, but the controllers are less-tolerant of voltage fluctuations than the panels. I was having issues with my controller dropping offline when displaying brighter colors and patterns on the panels. The voltage was dropping below the controller’s lower threshold, and it was simply shutting off. At least one controller manufacturer, Kulp, recommends using a separate PSU for the controller. This is another reason I decided to separate things.
For the controller- I simply mounted it in a 4″x4″ waterproof junction box using Alien/Nano tape. I had to cut a notch in the cover gasket for the ribbon cable, which I sealed in with clear RTV sealant:


I applied self-stick vinyl on the back of the panel assembly, and routed the wires for the controller and power out of the bottom of it. The controller’s box is simply screwed into the bottom of the frame. Again- this won’t be directly exposed to weather, so this should be more than sufficient to protect the panels and circuits.
The controller is a Kulp PocketScroller running FPP in Remote mode via WiFi. No controller or network wiring will be needed at all, although I can quickly add ethernet to it if I have to.
I added brackets at the top to mount it to the underside of the eave in the carport. There are separate wires for panel power and controller power, which will be run to an “Ammo Box” PSU enclosure with a 5v 60A PSU for the panels, and a 5v 5A PSU for the controller.

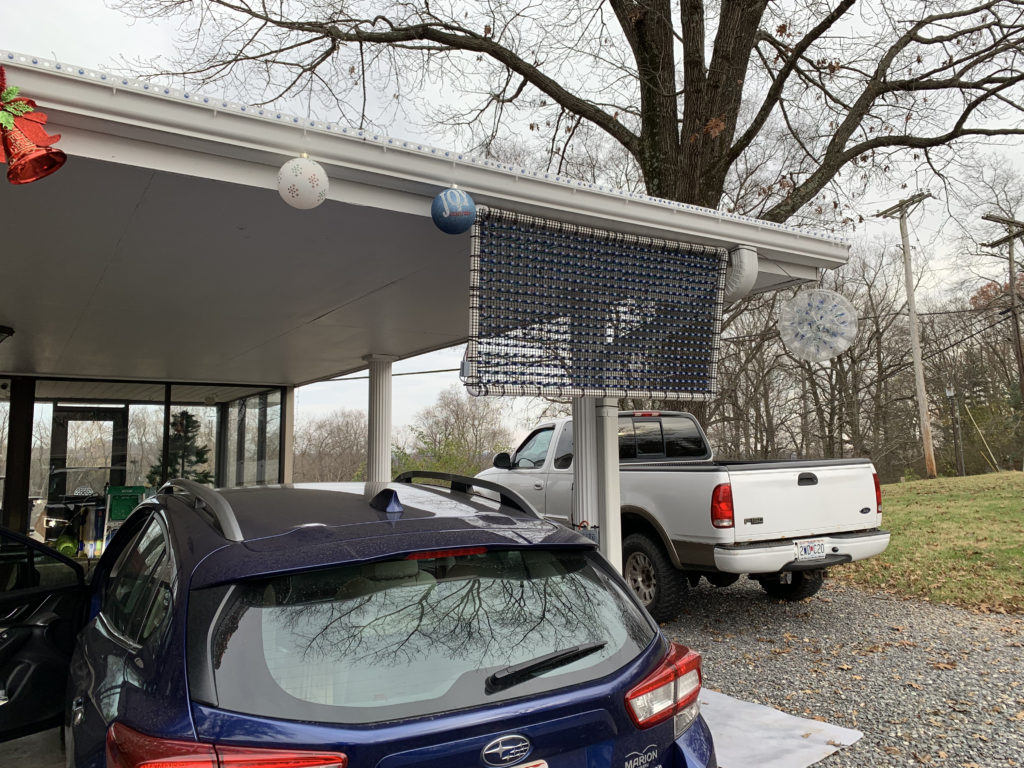
This Fall when I get it hung up, I will post more pictures of it in action, and of course it will be part of our display this year. We will use it for schedule and tune-in information, as well as graphic display elements.
Update, May 2021:
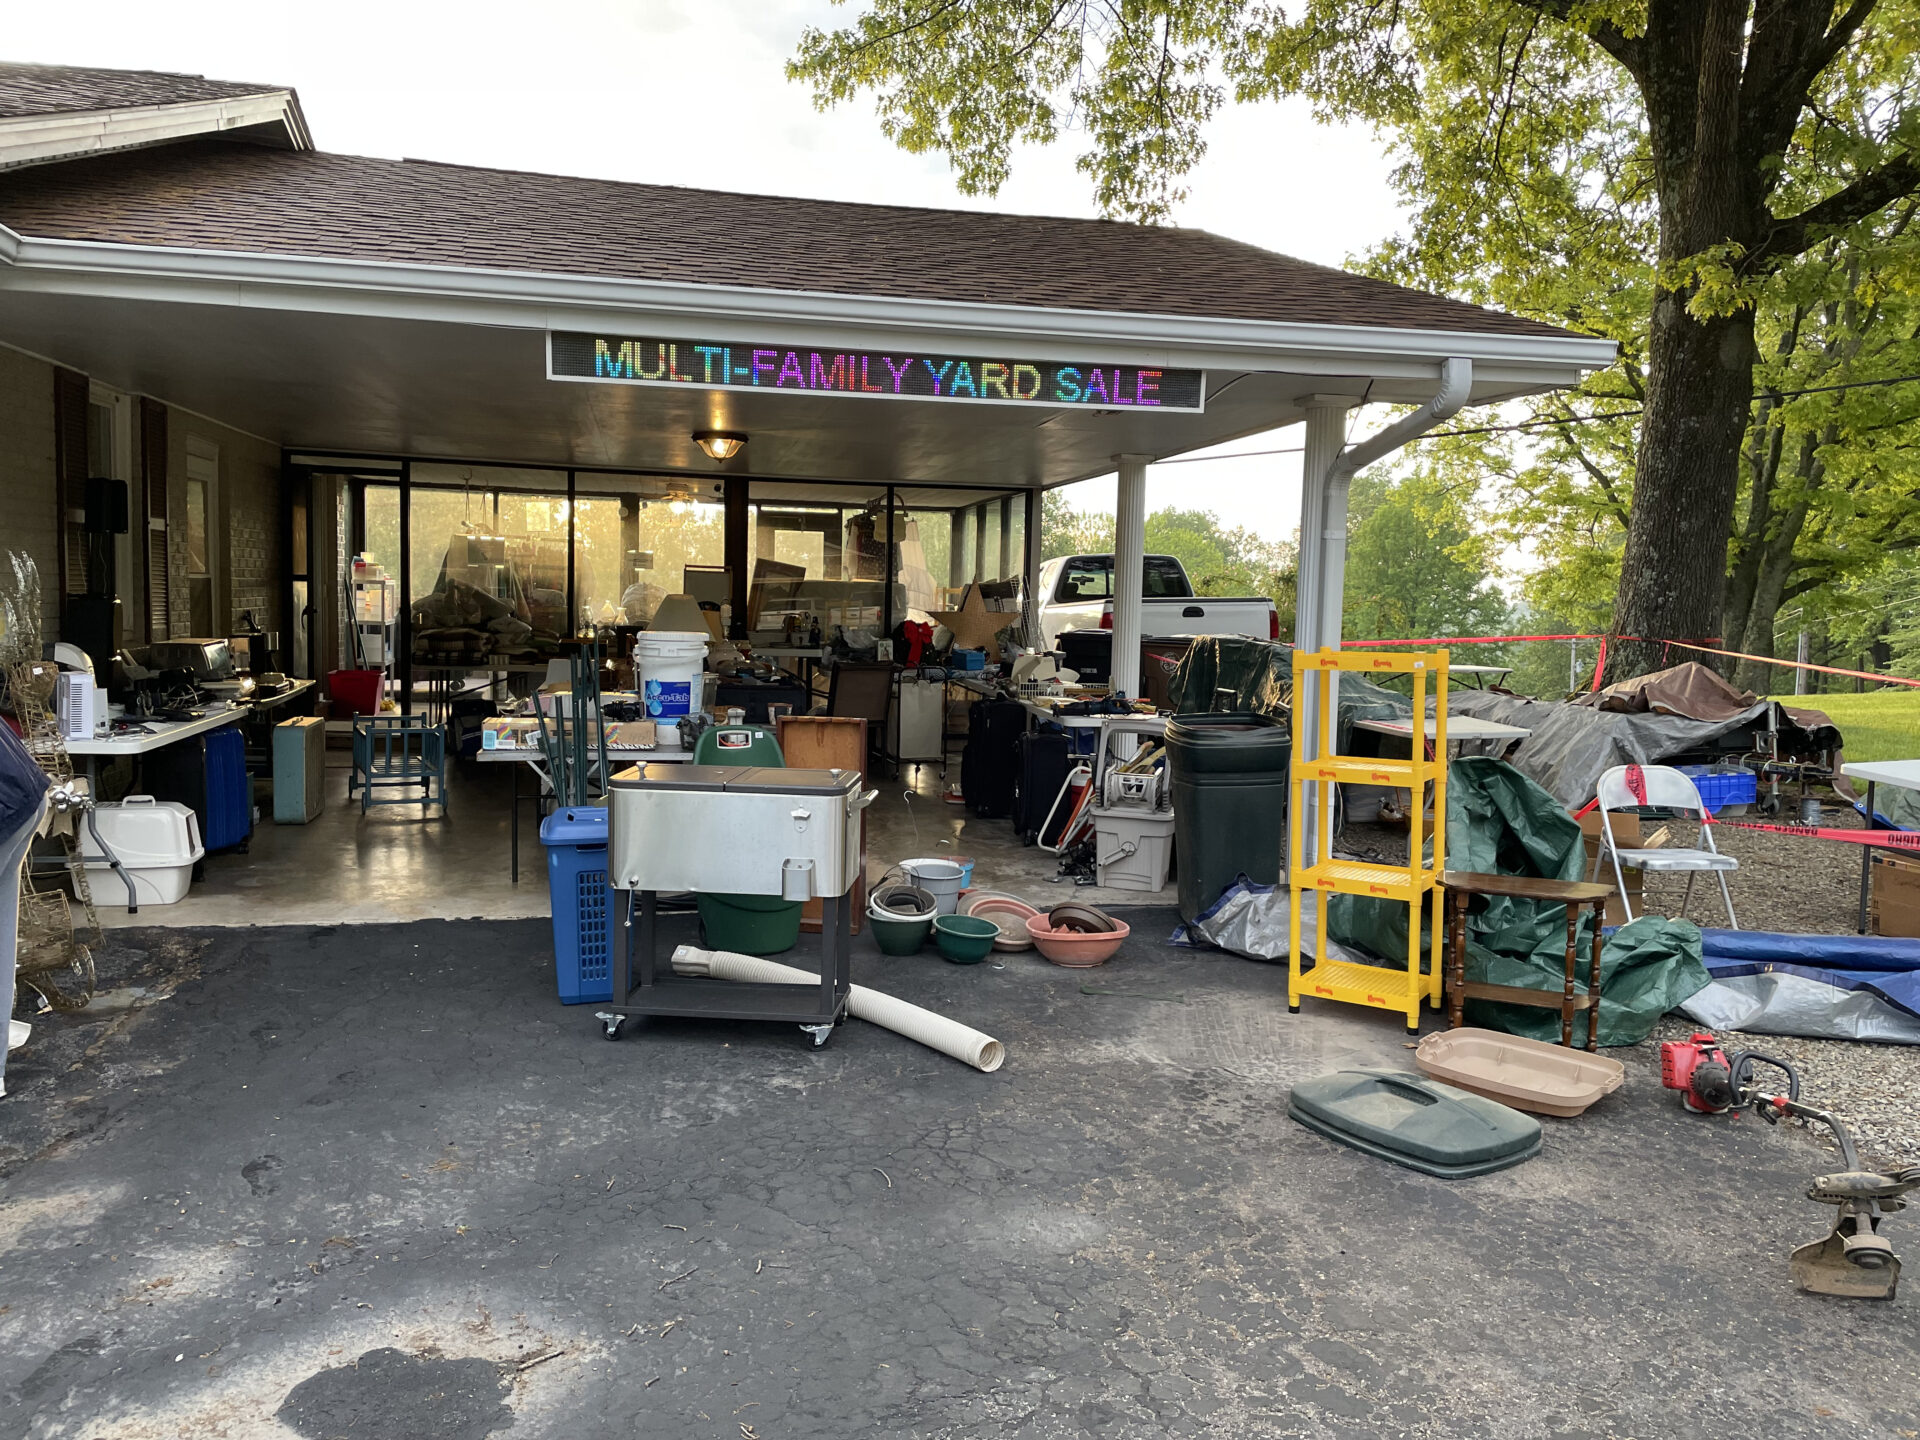
We did a big yard sale and I thought I would test the new sign as an info sign for it. It worked GREAT! For some reason it locked up a few times, which I traced to the “Brightness” plugin in FPP, although I’m not sure why it was causing an issue. I had no lock-ups at max. brightness after I removed the plugin. As I noted earlier- I’m using separate PSUs for the panels and controller, and both have plenty of current.
As of late May the sign is still up, but I don’t have it powered-up anymore. It’s low-profile and I kinda want to see how it holds up to the weather and heat, but my wife will probably make me take it down before much longer. 😊
Update, Oct. 2021
I got lazy and just never took the thing down. It was hung up in the same location all Summer, through high heat, wind, and LOTS of rain. It still works just fine! I’ve got it wired up to a new PSU for our Holiday show, and even have it automatically displaying show content now!
I’ll post another update during or after this year’s show as far as how well it performs. I also used the same sign vinyl for our new Column Matrix builds, which don’t even have frames.
Update, Dec. 2022
It’s still working great. I repositioned it slightly last summer to move it back a bit and center it better. There were some small holes in the front that I believe were caused by hail over the last year. I just used little pieces of clear Gorilla Tape to seal them. Heat and age also caused some of the vinyl on the back to come loose from the frame. I just used Gorilla Tape to re-attach it too. Otherwise- the vinyl itself seems to be holding up well. I also figured out that the controller was overheating in its little gray electrical box when the weather was warm, which was causing periodic failures. I put the controller and PSU in a vented ammo case mounted to the ceiling behind the sign, and it’s worked perfectly ever since. Keeping the PSU right next to the sign, instead of about 15′ away on the ground, also will help prevent lock-ups caused by under-voltage.


It just stays up there all year now, and I will put messages and graphics on it for holidays, like Independence Day, and of course if we have a yard sale. All I need to do is plug in the cord and upload a sequence to it. During our Christmas show- it is powered on and off by one of my relay boxes, and it runs autonomously collecting show data from the Show Runner (which is also “permanently” installed) and displaying song information, the tune-to frequency, and any other messages I upload to it.